HP Integrity Superdome SX2000 AD380A and AD381A PCIe 2-Port Gigabit Ethernet C - Page 11
Hardware and software installation procedures, Installing the hardware, Access the system card bay
 |
View all HP Integrity Superdome SX2000 manuals
Add to My Manuals
Save this manual to your list of manuals |
Page 11 highlights
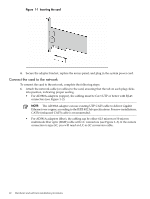
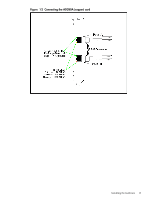
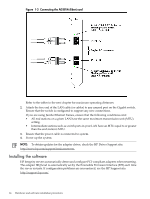
1 Hardware and software installation procedures The HP AD380A (copper) and AD381A (fiber) PCI Express Dual Port Gigabit Server Adapters are high-performance, low-profile PCI Express Ethernet adapters that deliver up to 1000 Mb/s Ethernet over twisted-pair copper cabling or optical fiber cabling. They have a fully integrated controller capable of auto-negotiating a link at 10, 100, or 1000 Mb/s. Network connections are made through two RJ-45 connectors (AD380A) or two duplex LC connectors (AD381A). LED indicators show the link speed and activity. These adapters are supported on selected HP Integrity servers. You can add or replace them in your system without shutting down or rebooting, using a process called Online Addition and Replacement (OLAR). However, they must be installed in a PCI Express slot. If your AD380A or AD381A card is factory installed, you do not need to perform the hardware and software installation steps described in this chapter. However, you need to configure the card's IP address and possibly set other parameters and options, such as those mentioned in the Network Card Configuration worksheet. Installing the hardware The following instructions guide you through the hardware installation process. These instructions assume you are not using the OLAR process. Access the system card bay To access the system card bay, complete the following steps: 1. If the system is running, issue the sync command. Then, shut down the system by executing the shutdown -h command. Enter Y to continue to the shutdown prompt. 2. Wait for the system to shut down completely, and then power off the system by pressing the system off button. Ensure that the system is grounded, and unplug the server power cord. WARNING! You must turn off and unplug the power to the HP server before removing its cover. Failure to do so could inflict a dangerous shock to you and may damage the adapter or the server. 3. Open the system to gain access to the PCIe backplane. 4. Select an unused PCIe slot and remove the slot cover. Install the card To install the card, complete the following steps: 1. Check the latest 1 Gb Ethernet support matrix to see the systems that support this card, how many cards are allowed per system, and if any software updates are needed. The support matrix is available in the "I/O Cards and Networking Software" section at: http://docs.hp.com 2. Record the serial number and MAC address located on the card for future reference. CAUTION: Electrostatic discharge can damage electronic components. You must observe antistatic precautions and wear electrostatic discharge (ESD) straps before installing the card. Refer to the section about electrostatic discharge in Chapter 2 for more information. 3. Grasp the card by its edges or faceplate with both hands. Insert the card into the slot and firmly, but gently, press the card in until it is fully seated (see Figure 1-1). Installing the hardware 11
-
 1
1 -
2
-
3
-
4
-
5
-
 6
6 -
 7
7 -
 8
8 -
 9
9 -
 10
10 -
 11
11 -
 12
12 -
 13
13 -
 14
14 -
 15
15 -
 16
16 -
17
-
18
-
19
-
20
-
21
-
22
-
23
-
24
-
25
-
26
-
27
-
28
-
29
-
30
 |
 |