HP Integrity Superdome SX2000 AD380A and AD381A PCIe 2-Port Gigabit Ethernet C - Page 15
Prepare for the Installation, Open the Computer Management program, Install the adapter driver
 |
View all HP Integrity Superdome SX2000 manuals
Add to My Manuals
Save this manual to your list of manuals |
Page 15 highlights
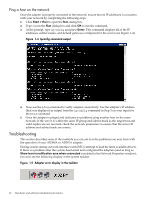
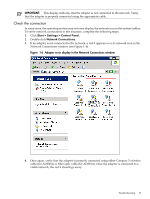
Prepare for the Installation After installing the adapter in the server and booting the system, you must install the correct driver. You can download the driver from the Web or get it from the HP SmartSetup media that came with the adapter. NOTE: When using the HP SmartSetup media, the Hardware Update Wizard finds the driver automatically. To download from the Web, complete the following steps: 1. Go to http://www.hp.com/support/itaniumservers. 2. Select one of the HP Integrity servers that supports this adapter (for example, rx2660). 3. Click Download drivers and software. 4. Click the link that describes the server operating system. 5. Click Driver-NIC. 6. Select the appropriate driver. 7. Download the driver to the server or to another system with a floppy or DVD writer. Open the Computer Management program Once the driver is available, open the Computer Management program by clicking Start > Programs > Administrative Tools > Computer Management. If the Programs menu displays Administrative Tools, skip this section and go to the next section and install the adapter driver using the Computer Management software. If the Programs menu does not display Administrative Tools, complete the following steps: 1. Right-click on the system taskbar. 2. Select Properties. 3. Click the Start Menu tab. 4. Click the Start menu radio button. 5. Click Customize. 6. Click the Advanced tab. 7. Select Display Administrative Tools as a Start Menu item. 8. Click Okay. 9. Click Okay again. 10. Click Start > Programs > Administrative Tools > Computer Management. Install the adapter driver To install the adapter driver, complete the following steps: 1. In the left panel of the Computer Management window, under System Tools, click Device Manager. 2. In the right panel of Computer Management, under Network Adapters, double-click the name of the adapter you just installed. 3. Click the Driver tab. 4. Click Update Driver..., and the Hardware Update Wizard displays. 5. Select No, not this time when prompted to let Windows find the driver. Then click Next. 6. Select Install the software automatically (Recommended) and click Next. 7. Click Finish to close the Hardware Update Wizard. 8. The driver is now installed and the device Properties page displays the new driver version. Installing the software 15
-
 1
1 -
2
-
3
-
4
-
5
-
6
-
7
-
8
-
9
-
 10
10 -
 11
11 -
 12
12 -
 13
13 -
 14
14 -
 15
15 -
 16
16 -
 17
17 -
 18
18 -
 19
19 -
 20
20 -
21
-
22
-
23
-
24
-
25
-
26
-
27
-
28
-
29
-
30
 |
 |