HP LH4r HP Netserver LH 3000 Rack Cabling Guide - Page 59
Mount the rack power subsystem, HP NetServer, HP Mass Storage Units, and peripheral
 |
View all HP LH4r manuals
Add to My Manuals
Save this manual to your list of manuals |
Page 59 highlights
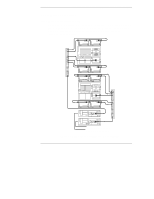
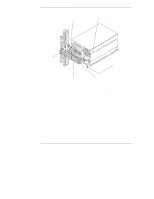
A Cabling Checklist Checklist for the Rack Cabling Process Use the Site Preparation Checklist in Chapter 1 to make sure your site is ready. Read and follow all Rack Assembly and Cabling Warnings in Chapter 1 and in the Assembly Instructions that accompany your HP Rack. Assemble (new) or assess (existing) rack equipment. Check Wattage, Volt Amps, and Amperage to ensure you do not overload your branch circuit breakers or the rack power supply and distribution equipment. Use tables in Chapter 2 and illustrations in Chapter 3 for this purpose. Mount the rack power subsystem, HP NetServer, HP Mass Storage Units, and peripheral equipment in the rack. Use instructions which come with them to mount the Power Distribution Unit(s) and the Cable Guides, and follow instructions in the HP NetServer LH 3000/3000r Installation Guide to mount Cable Management Arms. Attach data cables to the HP NetServer, leave slack for use in cable management, and connect cables to corresponding components. Attach power cables to the HP NetServer and other components in the rack, taking care to balance loads as necessary across PDUs and UPS units. Leave slack enough for use in cable management. See the section "Determining and Balancing Current Draw" in Chapter 3. Route cables through the Cable Management Arm(s) and the Cable Guides, and tie wrap them in place, if necessary. Power up components and then the server, following instructions in Chapter 3. 55
-
 1
1 -
2
-
3
-
4
-
5
-
6
-
7
-
8
-
9
-
10
-
11
-
12
-
13
-
14
-
15
-
16
-
17
-
18
-
19
-
20
-
21
-
22
-
23
-
24
-
25
-
26
-
27
-
28
-
29
-
30
-
31
-
32
-
33
-
34
-
35
-
36
-
37
-
38
-
39
-
40
-
41
-
42
-
43
-
44
-
45
-
46
-
47
-
48
-
49
-
50
-
51
-
52
-
53
-
 54
54 -
 55
55 -
 56
56 -
 57
57 -
 58
58 -
 59
59 -
 60
60 -
 61
61 -
 62
62 -
 63
63 -
 64
64 -
65
-
66
-
67
 |
 |
