HP LaserJet M9059 HP LaserJet M9059 MFP - User Guide - Page 227
Misformed characters, skew,
 |
View all HP LaserJet M9059 manuals
Add to My Manuals
Save this manual to your list of manuals |
Page 227 highlights
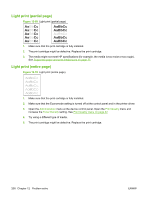
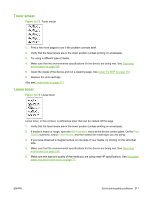
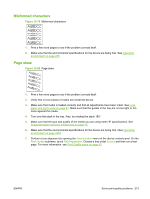
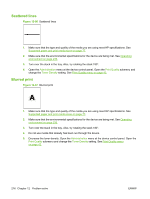
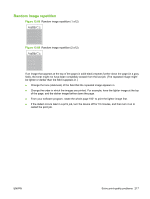
Misformed characters Figure 12-79 Misformed characters AaBbCc AaBbCc AaBbCc AaBbCc AaBbCc AaBbCc 1. Print a few more pages to see if the problem corrects itself. 2. Make sure that the environmental specifications for the device are being met. See Operating environment on page 236. Page skew Figure 12-80 Page skew 1. Print a few more pages to see if the problem corrects itself. 2. Verify that no torn pieces of media are inside the device. 3. Make sure that media is loaded correctly and that all adjustments have been made. See Load paper and print media on page 81. Make sure that the guides in the tray are not too tight or too loose against the media. 4. Turn over the stack in the tray. Also, try rotating the stack 180°. 5. Make sure that the type and quality of the media you are using meet HP specifications. See Supported paper and print media sizes on page 77. 6. Make sure that the environmental specifications for the device are being met. (See Operating environment on page 236.) 7. Perform a tray alignment by opening the Administration menu at the device control panel. On the Print Quality submenu, touch Set Registration. Choose a tray under Source and then run a test page. For more information, see Print Quality menu on page 42. ENWW Solve print-quality problems 213
-
 1
1 -
2
-
3
-
4
-
5
-
6
-
7
-
8
-
9
-
10
-
11
-
12
-
13
-
14
-
15
-
16
-
17
-
18
-
19
-
20
-
21
-
22
-
23
-
24
-
25
-
26
-
27
-
28
-
29
-
30
-
31
-
32
-
33
-
34
-
35
-
36
-
37
-
38
-
39
-
40
-
41
-
42
-
43
-
44
-
45
-
46
-
47
-
48
-
49
-
50
-
51
-
52
-
53
-
54
-
55
-
56
-
57
-
58
-
59
-
60
-
61
-
62
-
63
-
64
-
65
-
66
-
67
-
68
-
69
-
70
-
71
-
72
-
73
-
74
-
75
-
76
-
77
-
78
-
79
-
80
-
81
-
82
-
83
-
84
-
85
-
86
-
87
-
88
-
89
-
90
-
91
-
92
-
93
-
94
-
95
-
96
-
97
-
98
-
99
-
100
-
101
-
102
-
103
-
104
-
105
-
106
-
107
-
108
-
109
-
110
-
111
-
112
-
113
-
114
-
115
-
116
-
117
-
118
-
119
-
120
-
121
-
122
-
123
-
124
-
125
-
126
-
127
-
128
-
129
-
130
-
131
-
132
-
133
-
134
-
135
-
136
-
137
-
138
-
139
-
140
-
141
-
142
-
143
-
144
-
145
-
146
-
147
-
148
-
149
-
150
-
151
-
152
-
153
-
154
-
155
-
156
-
157
-
158
-
159
-
160
-
161
-
162
-
163
-
164
-
165
-
166
-
167
-
168
-
169
-
170
-
171
-
172
-
173
-
174
-
175
-
176
-
177
-
178
-
179
-
180
-
181
-
182
-
183
-
184
-
185
-
186
-
187
-
188
-
189
-
190
-
191
-
192
-
193
-
194
-
195
-
196
-
197
-
198
-
199
-
200
-
201
-
202
-
203
-
204
-
205
-
206
-
207
-
208
-
209
-
210
-
211
-
212
-
213
-
214
-
215
-
216
-
217
-
218
-
219
-
220
-
221
-
 222
222 -
 223
223 -
 224
224 -
 225
225 -
 226
226 -
 227
227 -
 228
228 -
 229
229 -
 230
230 -
 231
231 -
 232
232 -
233
-
234
-
235
-
236
-
237
-
238
-
239
-
240
-
241
-
242
-
243
-
244
-
245
-
246
-
247
-
248
-
249
-
250
-
251
-
252
-
253
-
254
-
255
-
256
-
257
-
258
-
259
-
260
-
261
-
262
-
263
-
264
-
265
-
266
-
267
-
268
-
269
-
270
-
271
-
272
 |
 |