HP LaserJet Pro M1217nfw HP LaserJet M1130/M1210 MFP User Guide Wireless Adden - Page 10
Product views, Control-panel layout, HP LaserJet Professional M1210 MFP series (wireless models only) - toner
 |
View all HP LaserJet Pro M1217nfw manuals
Add to My Manuals
Save this manual to your list of manuals |
Page 10 highlights
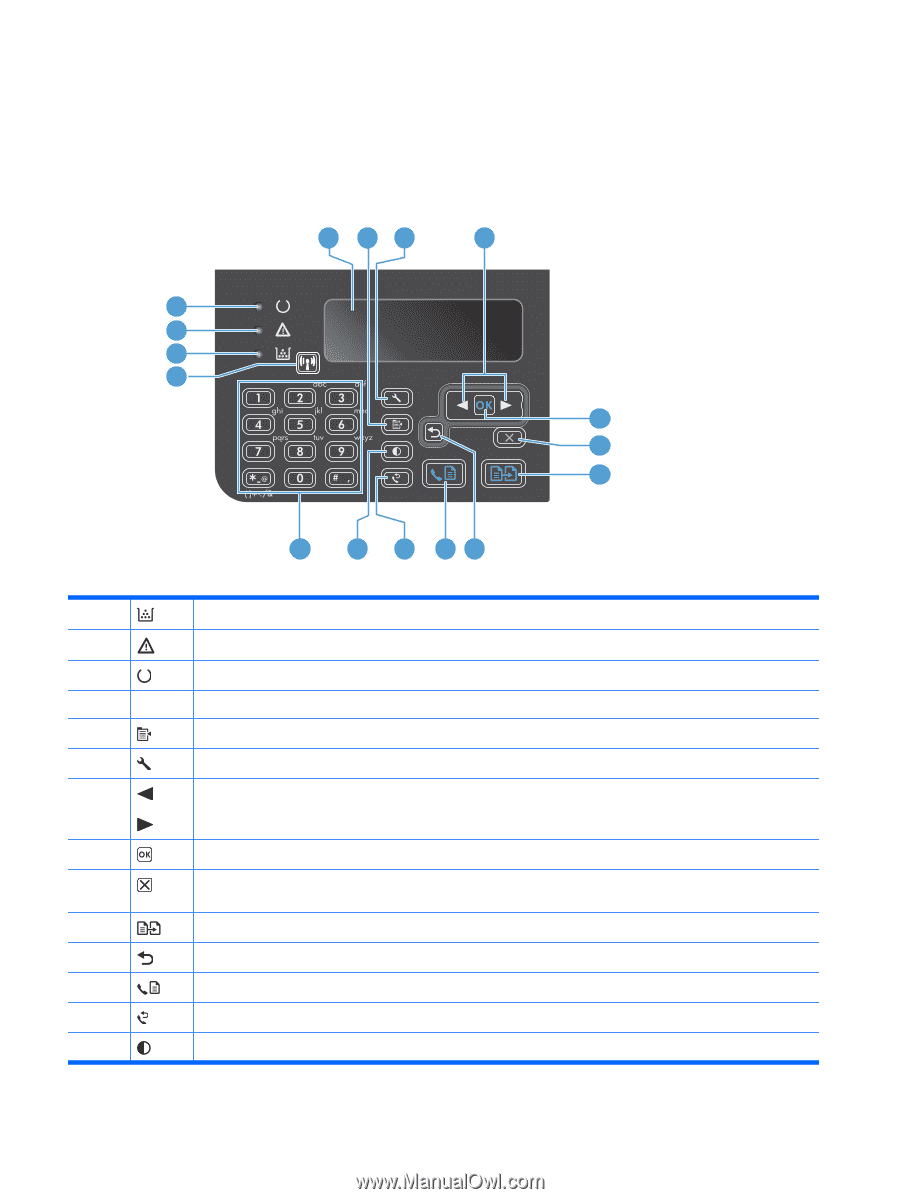
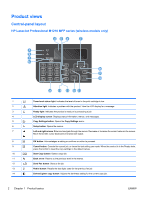
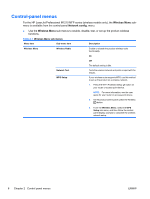
Product views Control-panel layout HP LaserJet Professional M1210 MFP series (wireless models only) 4 56 7 3 2 1 16 8 9 10 15 14 13 12 11 1 Toner-level status light: Indicates the level of toner in the print cartridge is low. 2 Attention light: Indicates a problem with the product. View the LCD display for a message. 3 Ready light: Indicates the product is ready or is processing a job. 4 LCD display screen: Displays status information, menus, and messages. 5 Copy Settings button: Opens the Copy Settings menu. 6 Setup button: Opens the menus. 7 Left and right arrows: Enter and navigate through the menus. Decrease or increase the current value on the screen. Move the screen cursor backward or forward one space. 8 OK button: Acknowledges a setting or confirms an action to proceed. 9 Cancel button: Cancels the current job, or clears the last setting you made. When the product is in the Ready state, press this button to reset the copy settings to the default values. 10 Start Copy button: Starts a copy job. 11 Back arrow: Returns to the previous level in the menus. 12 Send Fax button: Starts a fax job. 13 Redial button: Recalls the last digits used for the previous fax job. 14 Darker/Lighter copy button: Adjusts the darkness setting for the current copy job. 2 Chapter 1 Product basics ENWW
-
 1
1 -
2
-
3
-
4
-
 5
5 -
 6
6 -
 7
7 -
 8
8 -
 9
9 -
 10
10 -
 11
11 -
 12
12 -
 13
13 -
 14
14 -
 15
15 -
16
-
17
-
18
-
19
-
20
-
21
-
22
-
23
-
24
-
25
-
26
-
27
-
28
-
29
-
30
-
31
-
32
-
33
-
34
 |
 |