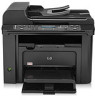
HP LaserJet Pro M1530 HP LaserJet Pro M1530 - Software Technical Reference - Page 55
General Windows installation for network connections, Network setup
 |
View all HP LaserJet Pro M1530 manuals
Add to My Manuals
Save this manual to your list of manuals |
Page 55 highlights
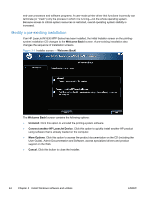
To install the HP postscript level 3 emulation printer driver, navigate to the appropriate folder and select the appropriate file: ● For 32-bit: \Drivers\win2k_xp_vista\hppcps08.inf ● For 64-bit: \Drivers\winxp_vistax64\hppdps08.inf 8. Click Open. 9. On the Install from Disk dialog box, click OK. 10. Click Next. Complete the installation. When prompted, print a test page to ensure that the printer driver is installed correctly. General Windows installation for network connections ● Network setup ● Windows installation instructions for network-connected products ● Printer-driver only installation instructions (Microsoft Add Printer Wizard) Network setup NOTE: Set up, turn on, and connect the product to the network before installing the software. To connect a product to a network, use the following instructions: 1. Connect the product to the network. 2. Turn on the product. NOTE: You must complete the power-up sequence in this order or the installer discovery utility fails to recognize the product. It might take a few minutes for the product to obtain a TCP/IP address. 3. To print a configuration page from the product control panel, press Setup . Use the arrow buttons to select Reports, and then press OK. Use the arrow buttons to select Config Report and then press OK. 4. Install the printing-system software. Use the information from the test pages to specify the network variables during installation. NOTE: A second page prints. On that page, the Fax Settings and Imaging Settings sections provide details about the product fax settings. Windows installation instructions for network-connected products NOTE: Complete the network setup before completing this procedure. Each computer that has the printing-system software installed can use all of the product features that are available over a network connection, except for the Receive faxes to this computer feature, which can only be enabled for one computer. ENWW General Windows installation instructions 41
-
 1
1 -
2
-
3
-
4
-
5
-
6
-
7
-
8
-
9
-
10
-
11
-
12
-
13
-
14
-
15
-
16
-
17
-
18
-
19
-
20
-
21
-
22
-
23
-
24
-
25
-
26
-
27
-
28
-
29
-
30
-
31
-
32
-
33
-
34
-
35
-
36
-
37
-
38
-
39
-
40
-
41
-
42
-
43
-
44
-
45
-
46
-
47
-
48
-
49
-
 50
50 -
 51
51 -
 52
52 -
 53
53 -
 54
54 -
 55
55 -
 56
56 -
 57
57 -
 58
58 -
 59
59 -
 60
60 -
61
-
62
-
63
-
64
-
65
-
66
-
67
-
68
-
69
-
70
-
71
-
72
-
73
-
74
-
75
-
76
-
77
-
78
-
79
-
80
-
81
-
82
-
83
-
84
-
85
-
86
-
87
-
88
-
89
-
90
-
91
-
92
-
93
-
94
-
95
-
96
-
97
-
98
-
99
-
100
-
101
-
102
-
103
-
104
-
105
-
106
-
107
-
108
-
109
-
110
-
111
-
112
-
113
-
114
-
115
-
116
-
117
-
118
 |
 |