HP LaserJet Pro M521 HP LaserJet Pro MFP M521 - User Guide - Page 148
Send a fax by dialing from a telephone connected to the fax line, Send a fax with confirmation
 |
View all HP LaserJet Pro M521 manuals
Add to My Manuals
Save this manual to your list of manuals |
Page 148 highlights
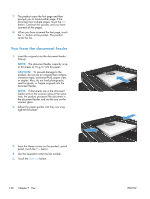
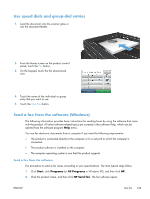
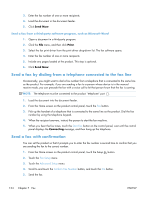
3. Enter the fax number of one or more recipients. 4. Load the document in the document feeder. 5. Click Send Now. Send a fax from a third-party software program, such as Microsoft Word 1. Open a document in a third-party program. 2. Click the File menu, and then click Print. 3. Select the fax print driver from the print driver drop-down list. The fax software opens. 4. Enter the fax number of one or more recipients. 5. Include any pages loaded at the product. This step is optional. 6. Click Send Now. Send a fax by dialing from a telephone connected to the fax line Occasionally, you might want to dial a fax number from a telephone that is connected to the same line as the product. For example, if you are sending a fax to a person whose device is in the manual receive mode, you can precede the fax with a voice call to let that person know that the fax is coming. NOTE: The telephone must be connected to the product "telephone" port . 1. Load the document into the document feeder. 2. From the Home screen on the product control panel, touch the Fax button. 3. Pick up the handset of a telephone that is connected to the same line as the product. Dial the fax number by using the telephone keypad. 4. When the recipient answers, instruct the person to start the fax machine. 5. When you hear the fax tones, touch the Start Fax button on the control panel, wait until the control panel displays the Connecting message, and then hang up the telephone. Send a fax with confirmation You can set the product so that it prompts you to enter the fax number a second time to confirm that you are sending the fax to the correct number. 1. From the Home screen on the product control panel, touch the Setup button. 2. Touch the Fax Setup menu. 3. Touch the Advanced Setup menu. 4. Scroll to and touch the Confirm Fax Number button, and touch the On button. 5. Send the fax. 134 Chapter 7 Fax ENWW
-
 1
1 -
2
-
3
-
4
-
5
-
6
-
7
-
8
-
9
-
10
-
11
-
12
-
13
-
14
-
15
-
16
-
17
-
18
-
19
-
20
-
21
-
22
-
23
-
24
-
25
-
26
-
27
-
28
-
29
-
30
-
31
-
32
-
33
-
34
-
35
-
36
-
37
-
38
-
39
-
40
-
41
-
42
-
43
-
44
-
45
-
46
-
47
-
48
-
49
-
50
-
51
-
52
-
53
-
54
-
55
-
56
-
57
-
58
-
59
-
60
-
61
-
62
-
63
-
64
-
65
-
66
-
67
-
68
-
69
-
70
-
71
-
72
-
73
-
74
-
75
-
76
-
77
-
78
-
79
-
80
-
81
-
82
-
83
-
84
-
85
-
86
-
87
-
88
-
89
-
90
-
91
-
92
-
93
-
94
-
95
-
96
-
97
-
98
-
99
-
100
-
101
-
102
-
103
-
104
-
105
-
106
-
107
-
108
-
109
-
110
-
111
-
112
-
113
-
114
-
115
-
116
-
117
-
118
-
119
-
120
-
121
-
122
-
123
-
124
-
125
-
126
-
127
-
128
-
129
-
130
-
131
-
132
-
133
-
134
-
135
-
136
-
137
-
138
-
139
-
140
-
141
-
142
-
 143
143 -
 144
144 -
 145
145 -
 146
146 -
 147
147 -
 148
148 -
 149
149 -
 150
150 -
 151
151 -
 152
152 -
 153
153 -
154
-
155
-
156
-
157
-
158
-
159
-
160
-
161
-
162
-
163
-
164
-
165
-
166
-
167
-
168
-
169
-
170
-
171
-
172
-
173
-
174
-
175
-
176
-
177
-
178
-
179
-
180
-
181
-
182
-
183
-
184
-
185
-
186
-
187
-
188
-
189
-
190
-
191
-
192
-
193
-
194
-
195
-
196
-
197
-
198
-
199
-
200
-
201
-
202
-
203
-
204
-
205
-
206
-
207
-
208
-
209
-
210
-
211
-
212
-
213
-
214
-
215
-
216
-
217
-
218
-
219
-
220
-
221
-
222
-
223
-
224
-
225
-
226
-
227
-
228
-
229
-
230
-
231
-
232
-
233
-
234
-
235
-
236
-
237
-
238
-
239
-
240
-
241
-
242
-
243
-
244
-
245
-
246
-
247
-
248
-
249
-
250
-
251
-
252
-
253
-
254
-
255
-
256
 |
 |