HP LaserJet Pro MFP M148-M149 User Guide - Page 96
Method two: Set up the Scan to Network Folder feature via the HP Embedded Web Server (Windows)
 |
View all HP LaserJet Pro MFP M148-M149 manuals
Add to My Manuals
Save this manual to your list of manuals |
Page 96 highlights
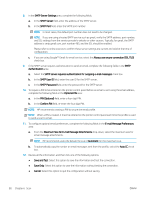
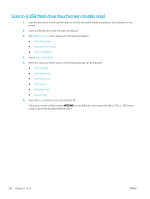
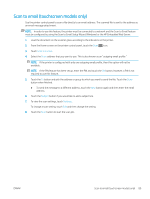
NOTE: When a PIN is created, it must be entered on the printer control panel each time a scan is sent to the network folder. 8. On the 2. Authenticate page, enter the Windows User Name and Windows Password used to log in to the computer, and then click Next. 9. On the 3. Configure page, select the default scan settings by completing the following task, and then click Next. a. From the Document Type drop-down, select the default file format for scanned files. b. From the Color Preference drop-down, select Black & White or Color. c. From the Paper Size drop-down, select the default paper size for scanned files. d. From the Quality Settings drop-down, select the default resolution for scanned files. NOTE: Higher resolution images have more dots per inch (dpi), so they show more detail. Lower resolution images have fewer dots per inch and show less detail, but the file size is smaller. e. In the Filename Prefix field, enter a file name prefix (e.g., MyScan). 10. On the 4. Finish page, review the information and verify all the settings are correct. If there is an error, click the Back button to correct the error. If the settings are correct, click the Save and Test button to test the configuration. 11. When the Congratulations message displays, click Finish to complete the configuration. 12. The Network Folder Profiles dialog now shows the newly added sender email profile. Click Close to exit the wizard. Method two: Set up the Scan to Network Folder feature via the HP Embedded Web Server (Windows) ● Step one: Access the HP Embedded Web Server (EWS) ● Step two: Configure the Scan to Network Folder feature Step one: Access the HP Embedded Web Server (EWS) 1. From the Home screen on the printer control panel, touch the Network button to display the IP address or host name. button or the Wireless 2. Open a web browser, and in the address line, type the IP address or host name exactly as it displays on the printer control panel. Press the Enter key on the computer keyboard. The EWS opens. NOTE: If the web browser displays a message indicating that accessing the website might not be safe, select the option to continue to the website. Accessing this website will not harm the computer. Step two: Configure the Scan to Network Folder feature 1. In the HP EWS, click the System tab. 2. On the left navigation pane, click the Administration link. 84 Chapter 6 Scan ENWW
-
 1
1 -
2
-
3
-
4
-
5
-
6
-
7
-
8
-
9
-
10
-
11
-
12
-
13
-
14
-
15
-
16
-
17
-
18
-
19
-
20
-
21
-
22
-
23
-
24
-
25
-
26
-
27
-
28
-
29
-
30
-
31
-
32
-
33
-
34
-
35
-
36
-
37
-
38
-
39
-
40
-
41
-
42
-
43
-
44
-
45
-
46
-
47
-
48
-
49
-
50
-
51
-
52
-
53
-
54
-
55
-
56
-
57
-
58
-
59
-
60
-
61
-
62
-
63
-
64
-
65
-
66
-
67
-
68
-
69
-
70
-
71
-
72
-
73
-
74
-
75
-
76
-
77
-
78
-
79
-
80
-
81
-
82
-
83
-
84
-
85
-
86
-
87
-
88
-
89
-
90
-
 91
91 -
 92
92 -
 93
93 -
 94
94 -
 95
95 -
 96
96 -
 97
97 -
 98
98 -
 99
99 -
 100
100 -
 101
101 -
102
-
103
-
104
-
105
-
106
-
107
-
108
-
109
-
110
-
111
-
112
-
113
-
114
-
115
-
116
-
117
-
118
-
119
-
120
-
121
-
122
-
123
-
124
-
125
-
126
-
127
-
128
-
129
-
130
-
131
-
132
-
133
-
134
-
135
-
136
-
137
-
138
-
139
-
140
-
141
-
142
-
143
-
144
-
145
-
146
-
147
-
148
-
149
-
150
-
151
-
152
-
153
-
154
-
155
-
156
-
157
-
158
-
159
-
160
-
161
-
162
-
163
-
164
-
165
-
166
-
167
-
168
-
169
-
170
-
171
-
172
-
173
-
174
-
175
-
176
-
177
-
178
-
179
-
180
-
181
-
182
-
183
-
184
-
185
-
186
-
187
-
188
-
189
-
190
-
191
-
192
-
193
-
194
-
195
-
196
-
197
-
198
-
199
-
200
-
201
-
202
-
203
-
204
-
205
-
206
-
207
-
208
 |
 |