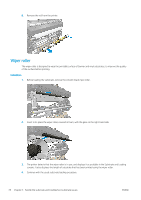
HP Latex 570 User Guide - Page 86
unable to load it successfully., command will not work if the cutter is disabled: that is, if
 |
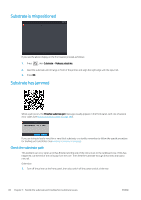
View all HP Latex 570 manuals
Add to My Manuals
Save this manual to your list of manuals |
Page 86 highlights
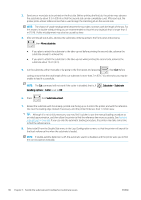
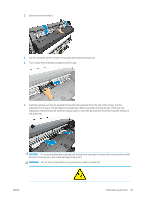
3. Send one or more jobs to be printed on the first side. Before printing the first job, the printer may advance the substrate by about 0.5 m (20 in) so that the second side can be completely cured. After each job, the printer prints a black reference line that is used to align the matching job on the second side. NOTE: The chance of visible misalignment between the two sides increases with the length of the job. For this reason, in double-sided printing you are recommended not to print any single job that is longer than 3 m (10 ft). Visible misalignment may also be caused by skew. 4. After printing all side A jobs, advance the substrate a little by going to the front panel and pressing , then Move substrate. ● If you plan to attach the substrate to the take-up reel before printing the second side, advance the substrate enough to achieve this. ● If you plan to attach the substrate to the take-up reel while printing the second side, advance the substrate about 10 cm (4 in). 5. Cut the substrate, either manually or by going to the front panel and pressing , then Cut. Before cutting, ensure that the total length of the cut substrate is more than 2 m (6 ft 7 in), otherwise you may be unable to load it successfully. NOTE: The Cut command will not work if the cutter is disabled: that is, if handling options > Cutter is set to Off. , Substrate > Substrate 6. Press , then Substrate unload. 7. Reload the substrate with the already-printed side facing up as it enters the printer, and with the reference line near the leading edge. Reload if necessary until the printer finds less than 1 mm/m skew. TIP: Although it is not strictly necessary, you may find it quicker to use the manual loading procedure as an initial approximation, and then allow the printer to find the reference line more accurately. See Assisted manual load on page 66. If you use only the automatic loading procedure, the printer may take some time to find the reference line. 8. Select side B from the Double Side menu in the Load Configuration screen, so that the printer will search for the black reference line when the substrate is loaded. NOTE: If enable autoline detection is off, the automatic search is disabled, and the printer asks you to find the correct position manually. 80 Chapter 3 Handle the substrate and troubleshoot substrate issues ENWW
-
 1
1 -
2
-
3
-
4
-
5
-
6
-
7
-
8
-
9
-
10
-
11
-
12
-
13
-
14
-
15
-
16
-
17
-
18
-
19
-
20
-
21
-
22
-
23
-
24
-
25
-
26
-
27
-
28
-
29
-
30
-
31
-
32
-
33
-
34
-
35
-
36
-
37
-
38
-
39
-
40
-
41
-
42
-
43
-
44
-
45
-
46
-
47
-
48
-
49
-
50
-
51
-
52
-
53
-
54
-
55
-
56
-
57
-
58
-
59
-
60
-
61
-
62
-
63
-
64
-
65
-
66
-
67
-
68
-
69
-
70
-
71
-
72
-
73
-
74
-
75
-
76
-
77
-
78
-
79
-
80
-
 81
81 -
 82
82 -
 83
83 -
 84
84 -
 85
85 -
 86
86 -
 87
87 -
 88
88 -
 89
89 -
 90
90 -
 91
91 -
92
-
93
-
94
-
95
-
96
-
97
-
98
-
99
-
100
-
101
-
102
-
103
-
104
-
105
-
106
-
107
-
108
-
109
-
110
-
111
-
112
-
113
-
114
-
115
-
116
-
117
-
118
-
119
-
120
-
121
-
122
-
123
-
124
-
125
-
126
-
127
-
128
-
129
-
130
-
131
-
132
-
133
-
134
-
135
-
136
-
137
-
138
-
139
-
140
-
141
-
142
-
143
-
144
-
145
-
146
-
147
-
148
-
149
-
150
-
151
-
152
-
153
-
154
-
155
-
156
-
157
-
158
-
159
-
160
-
161
-
162
-
163
-
164
-
165
-
166
-
167
-
168
-
169
-
170
-
171
-
172
-
173
-
174
-
175
-
176
-
177
-
178
-
179
-
180
-
181
-
182
-
183
-
184
-
185
-
186
-
187
-
188
-
189
-
190
-
191
-
192
-
193
-
194
-
195
-
196
-
197
-
198
-
199
-
200
-
201
-
202
-
203
 |
 |