HP Latex R2000 User Guide - Page 17
Warnings and cautions, Warning labels, WARNING, CAUTION
 |
View all HP Latex R2000 manuals
Add to My Manuals
Save this manual to your list of manuals |
Page 17 highlights
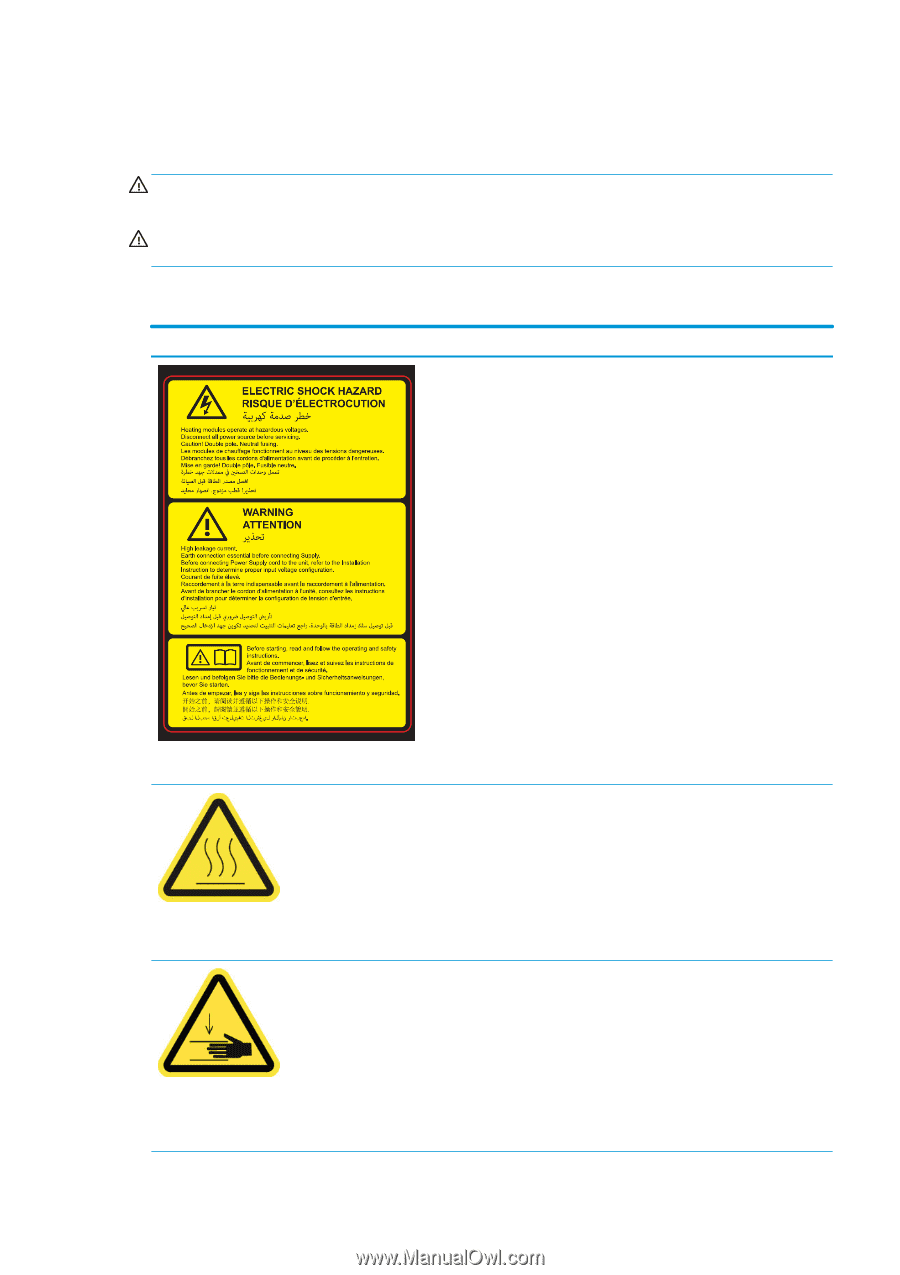
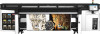
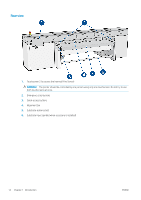
Warnings and cautions The following symbols are used in this manual to ensure the proper use of the printer and to prevent the printer from being damaged. Follow the instructions marked with these symbols. WARNING! Failure to follow the guidelines marked with this symbol could result in serious personal injury or death. CAUTION: Failure to follow the guidelines marked with this symbol could result in minor personal injury or damage to the product. Warning labels Label Located on the power box Explanation Electric shock hazard Heating modules operate at hazardous voltage. Disconnect power source before servicing. Caution! Double pole. Neutral fusing. Refer servicing to qualified service personnel. In case of operation of the fuse, parts of the printer that remain energized may represent a hazard during servicing. Turn off the printer using both Branch Circuit Breakers located in the building's Power Distribution Unit (PDU) before servicing. Warning High leakage current. Current leakage may exceed 3.5 mA. Earth connection essential before connecting supply. Equipment to be connected to earthed mains only. See installation instructions before connecting to the supply. Ensure that the input voltage is within the printer's rated voltage range. The printer requires up to two dedicated lines, each protected by a branch circuit breaker according to site preparation requirements. Read and follow the operating and safety instructions before starting the printer. Risk of burns. Do not touch the internal enclosures of the printer's drying and curing modules. Do not touch the LED array and enclosures when accessing the substrate path. Located on the curing modules and edge holders, and seen in the Internal Print Server when high-temperature print modes are used Crush hazard. Do not touch the scan-axis beam motor gear, drying beam, or curing module while moving. When substrate has been loaded, the carriage and curing subsystem descend into their normal position, and could crush your hand or anything else left underneath it. Watch your hand when closing curing modules. Located on each side of the substrate path, close to the scan-axis beam motor gear and curing module motor gears, and to the right of the top cover ENWW Safety precautions 9
-
 1
1 -
2
-
3
-
4
-
5
-
6
-
7
-
8
-
9
-
10
-
11
-
 12
12 -
 13
13 -
 14
14 -
 15
15 -
 16
16 -
 17
17 -
 18
18 -
 19
19 -
 20
20 -
 21
21 -
 22
22 -
23
-
24
-
25
-
26
-
27
-
28
-
29
-
30
-
31
-
32
-
33
-
34
-
35
-
36
-
37
-
38
-
39
-
40
-
41
-
42
-
43
-
44
-
45
-
46
-
47
-
48
-
49
-
50
-
51
-
52
-
53
-
54
-
55
-
56
-
57
-
58
-
59
-
60
-
61
-
62
-
63
-
64
-
65
-
66
-
67
-
68
-
69
-
70
-
71
-
72
-
73
-
74
-
75
-
76
-
77
-
78
-
79
-
80
-
81
-
82
-
83
-
84
-
85
-
86
-
87
-
88
-
89
-
90
-
91
-
92
-
93
-
94
-
95
-
96
-
97
-
98
-
99
-
100
-
101
-
102
-
103
-
104
-
105
-
106
-
107
-
108
-
109
-
110
-
111
-
112
-
113
-
114
-
115
-
116
-
117
-
118
-
119
-
120
-
121
-
122
-
123
-
124
-
125
-
126
-
127
-
128
-
129
-
130
-
131
-
132
-
133
-
134
-
135
-
136
-
137
-
138
-
139
-
140
-
141
-
142
-
143
-
144
-
145
-
146
-
147
-
148
-
149
-
150
-
151
-
152
-
153
-
154
-
155
-
156
-
157
-
158
-
159
-
160
-
161
-
162
-
163
-
164
-
165
-
166
-
167
-
168
-
169
-
170
-
171
-
172
-
173
-
174
-
175
-
176
-
177
-
178
-
179
-
180
-
181
-
182
-
183
-
184
-
185
-
186
-
187
-
188
-
189
-
190
-
191
-
192
-
193
-
194
-
195
-
196
-
197
-
198
-
199
-
200
-
201
-
202
-
203
-
204
-
205
-
206
-
207
-
208
-
209
-
210
-
211
-
212
-
213
-
214
-
215
-
216
-
217
-
218
-
219
-
220
-
221
-
222
-
223
-
224
-
225
-
226
-
227
-
228
-
229
-
230
-
231
-
232
-
233
-
234
-
235
-
236
-
237
-
238
-
239
-
240
-
241
-
242
-
243
-
244
-
245
-
246
-
247
-
248
-
249
-
250
-
251
-
252
-
253
-
254
-
255
-
256
-
257
-
258
-
259
-
260
-
261
-
262
-
263
-
264
-
265
-
266
-
267
-
268
-
269
-
270
-
271
-
272
-
273
-
274
-
275
-
276
-
277
-
278
-
279
-
280
-
281
-
282
-
283
-
284
-
285
-
286
-
287
-
288
-
289
-
290
-
291
-
292
-
293
-
294
-
295
-
296
-
297
-
298
-
299
-
300
-
301
-
302
-
303
-
304
-
305
-
306
-
307
-
308
-
309
-
310
-
311
-
312
-
313
-
314
-
315
-
316
-
317
-
318
-
319
-
320
-
321
-
322
-
323
-
324
-
325
-
326
-
327
-
328
-
329
-
330
-
331
-
332
-
333
-
334
-
335
-
336
-
337
-
338
-
339
-
340
-
341
-
342
-
343
-
344
-
345
-
346
 |
 |