HP Latex R2000 User Guide - Page 270
The Internal Print Server recommends replacing or reseating a printhead, General recommendations
 |
View all HP Latex R2000 manuals
Add to My Manuals
Save this manual to your list of manuals |
Page 270 highlights
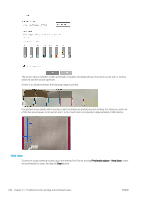
The Internal Print Server recommends replacing or reseating a printhead General recommendations 1. Remove the printhead. 2. Reinsert the printhead into the carriage and check the Internal Print Server message. 3. If the problem persists, check the printhead contacts for dirt or aerosol and clean them if necessary. See Clean the printhead contacts on page 200. 4. Find more troubleshooting information in the following sections, Problem due to overheating on page 262 and Problem due to the primer system on page 262. 5. If the problem persists, insert a new printhead. 6. If no printhead works in that slot, call your service representative. Problem due to overheating A printhead may overheat for several reasons: ● The room temperature may be too high. ● The printhead may be suffering from blocked nozzles. You may be able to cure this problem by cleaning the printheads (see Check and clean the printheads on page 97). ● The printhead may be faulty, in which case it should be replaced. Problem due to the primer system Primers are important to the printheads' nozzle health. When there is a problem with a primer, the Internal Print Server displays the following messages. During a printhead replacement ● A reseat message for a particular printhead ● A printhead replacement incomplete message ● A numerical error code starting with 0088 (for colour primers) or 1088 (for white primers): 0088-00XXYYZZ or 1088-00XX-YYZZ During a printhead servicing routine ● A reseat message for a particular printhead ● A numerical error code starting with 0088 (for colour primers) or 1088 (for white primers): 0088-00XXYYZZ or 1088-00XX-YYZZ The message 0088-0001-0Y41 - Primer 0Y leakage detected (or 1088-0001-0Y41 for white primers) indicates that one of the primer systems leaks. The number 0Y indicates which primer is leaking, where Y ranges from 1 to 6 for colour primers and from 1 to 2 for white primers. You are recommended to: ● Run the primer diagnostic test from the diagnostics window to confirm the cause of the error. ● Reseat the printhead. Make sure to push the primer into position before securing the latch. While running the test, you will already have done it at least once. 262 Chapter 13 Troubleshoot ink cartridge and printhead issues ENWW
-
 1
1 -
2
-
3
-
4
-
5
-
6
-
7
-
8
-
9
-
10
-
11
-
12
-
13
-
14
-
15
-
16
-
17
-
18
-
19
-
20
-
21
-
22
-
23
-
24
-
25
-
26
-
27
-
28
-
29
-
30
-
31
-
32
-
33
-
34
-
35
-
36
-
37
-
38
-
39
-
40
-
41
-
42
-
43
-
44
-
45
-
46
-
47
-
48
-
49
-
50
-
51
-
52
-
53
-
54
-
55
-
56
-
57
-
58
-
59
-
60
-
61
-
62
-
63
-
64
-
65
-
66
-
67
-
68
-
69
-
70
-
71
-
72
-
73
-
74
-
75
-
76
-
77
-
78
-
79
-
80
-
81
-
82
-
83
-
84
-
85
-
86
-
87
-
88
-
89
-
90
-
91
-
92
-
93
-
94
-
95
-
96
-
97
-
98
-
99
-
100
-
101
-
102
-
103
-
104
-
105
-
106
-
107
-
108
-
109
-
110
-
111
-
112
-
113
-
114
-
115
-
116
-
117
-
118
-
119
-
120
-
121
-
122
-
123
-
124
-
125
-
126
-
127
-
128
-
129
-
130
-
131
-
132
-
133
-
134
-
135
-
136
-
137
-
138
-
139
-
140
-
141
-
142
-
143
-
144
-
145
-
146
-
147
-
148
-
149
-
150
-
151
-
152
-
153
-
154
-
155
-
156
-
157
-
158
-
159
-
160
-
161
-
162
-
163
-
164
-
165
-
166
-
167
-
168
-
169
-
170
-
171
-
172
-
173
-
174
-
175
-
176
-
177
-
178
-
179
-
180
-
181
-
182
-
183
-
184
-
185
-
186
-
187
-
188
-
189
-
190
-
191
-
192
-
193
-
194
-
195
-
196
-
197
-
198
-
199
-
200
-
201
-
202
-
203
-
204
-
205
-
206
-
207
-
208
-
209
-
210
-
211
-
212
-
213
-
214
-
215
-
216
-
217
-
218
-
219
-
220
-
221
-
222
-
223
-
224
-
225
-
226
-
227
-
228
-
229
-
230
-
231
-
232
-
233
-
234
-
235
-
236
-
237
-
238
-
239
-
240
-
241
-
242
-
243
-
244
-
245
-
246
-
247
-
248
-
249
-
250
-
251
-
252
-
253
-
254
-
255
-
256
-
257
-
258
-
259
-
260
-
261
-
262
-
263
-
264
-
 265
265 -
 266
266 -
 267
267 -
 268
268 -
 269
269 -
 270
270 -
 271
271 -
 272
272 -
 273
273 -
 274
274 -
 275
275 -
276
-
277
-
278
-
279
-
280
-
281
-
282
-
283
-
284
-
285
-
286
-
287
-
288
-
289
-
290
-
291
-
292
-
293
-
294
-
295
-
296
-
297
-
298
-
299
-
300
-
301
-
302
-
303
-
304
-
305
-
306
-
307
-
308
-
309
-
310
-
311
-
312
-
313
-
314
-
315
-
316
-
317
-
318
-
319
-
320
-
321
-
322
-
323
-
324
-
325
-
326
-
327
-
328
-
329
-
330
-
331
-
332
-
333
-
334
-
335
-
336
-
337
-
338
-
339
-
340
-
341
-
342
-
343
-
344
-
345
-
346
 |
 |
