HP M517 HP Photosmart M417/M517 Digital Camera with HP Instant Share - User's - Page 51
Adaptive Lighting, You can use
 |
UPC - 829160821870
View all HP M517 manuals
Add to My Manuals
Save this manual to your list of manuals |
Page 51 highlights
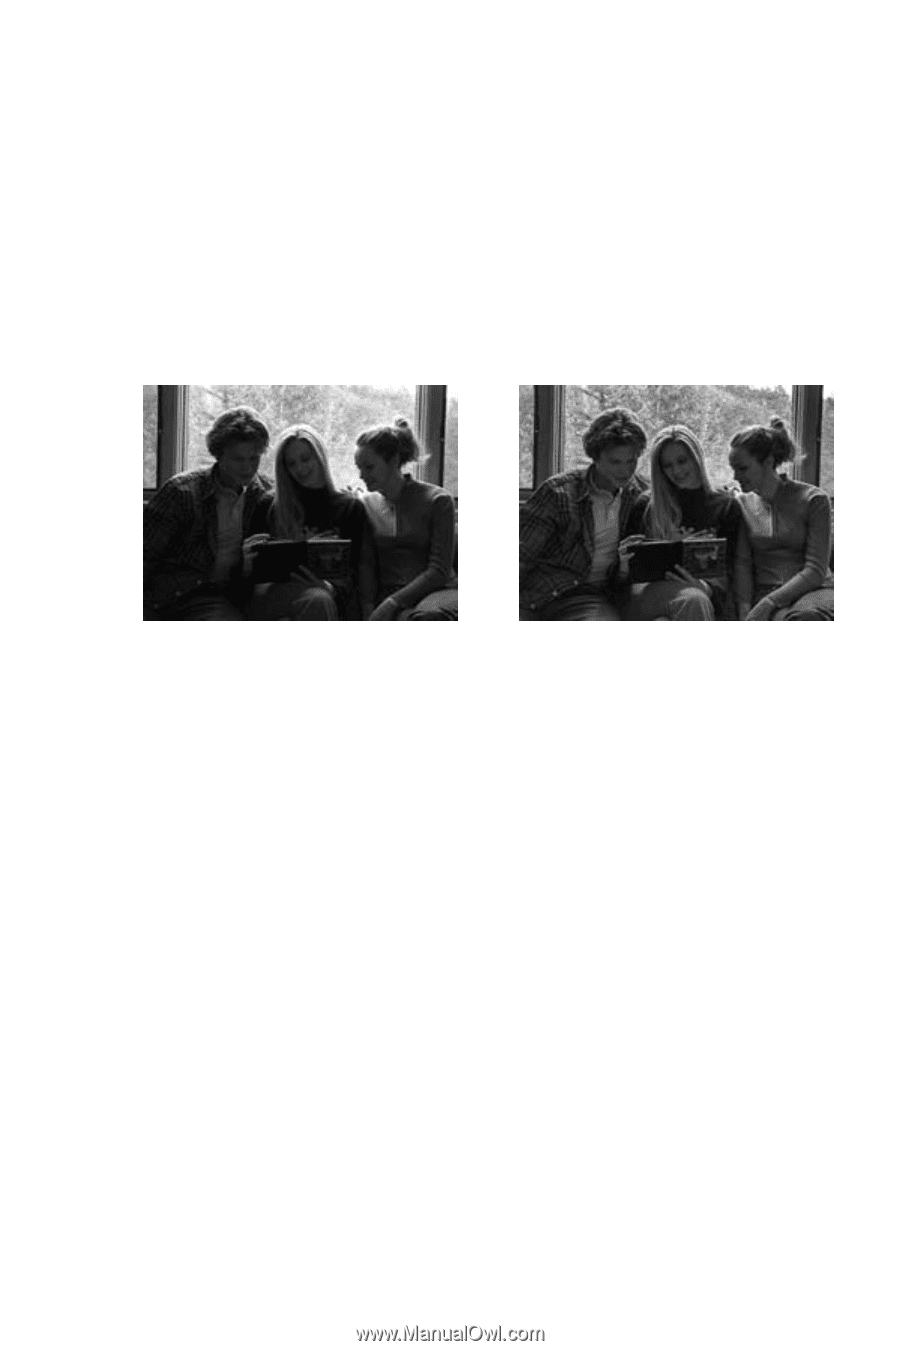
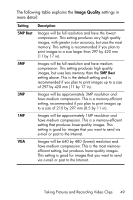
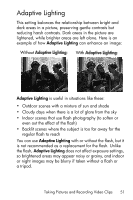
Adaptive Lighting This setting balances the relationship between bright and dark areas in a picture, preserving gentle contrasts but reducing harsh contrasts. Dark areas in the picture are lightened, while brighter areas are left alone. Here is an example of how Adaptive Lighting can enhance an image: Without Adaptive Lighting: With Adaptive Lighting: Adaptive Lighting is useful in situations like these: • Outdoor scenes with a mixture of sun and shade • Cloudy days when there is a lot of glare from the sky • Indoor scenes that use flash photography (to soften or even out the effect of the flash) • Backlit scenes where the subject is too far away for the regular flash to reach You can use Adaptive Lighting with or without the flash, but it is not recommended as a replacement for the flash. Unlike the flash, Adaptive Lighting does not affect exposure settings, so brightened areas may appear noisy or grainy, and indoor or night images may be blurry if taken without a flash or a tripod. Taking Pictures and Recording Video Clips 51
-
 1
1 -
2
-
3
-
4
-
5
-
6
-
7
-
8
-
9
-
10
-
11
-
12
-
13
-
14
-
15
-
16
-
17
-
18
-
19
-
20
-
21
-
22
-
23
-
24
-
25
-
26
-
27
-
28
-
29
-
30
-
31
-
32
-
33
-
34
-
35
-
36
-
37
-
38
-
39
-
40
-
41
-
42
-
43
-
44
-
45
-
 46
46 -
 47
47 -
 48
48 -
 49
49 -
 50
50 -
 51
51 -
 52
52 -
 53
53 -
 54
54 -
 55
55 -
 56
56 -
57
-
58
-
59
-
60
-
61
-
62
-
63
-
64
-
65
-
66
-
67
-
68
-
69
-
70
-
71
-
72
-
73
-
74
-
75
-
76
-
77
-
78
-
79
-
80
-
81
-
82
-
83
-
84
-
85
-
86
-
87
-
88
-
89
-
90
-
91
-
92
-
93
-
94
-
95
-
96
-
97
-
98
-
99
-
100
-
101
-
102
-
103
-
104
-
105
-
106
-
107
-
108
-
109
-
110
-
111
-
112
-
113
-
114
-
115
-
116
-
117
-
118
-
119
-
120
-
121
-
122
-
123
-
124
-
125
-
126
-
127
-
128
-
129
-
130
-
131
-
132
-
133
-
134
-
135
-
136
-
137
-
138
-
139
-
140
-
141
-
142
-
143
-
144
-
145
-
146
-
147
-
148
-
149
-
150
-
151
-
152
-
153
-
154
-
155
-
156
-
157
-
158
-
159
-
160
-
161
-
162
-
163
-
164
-
165
-
166
-
167
-
168
-
169
-
170
-
171
-
172
-
173
-
174
-
175
-
176
-
177
 |
 |