HP Mini 210-3060ca HP Mini 210, HP Mini 110, and Compaq Mini CQ10 Maintenance - Page 62
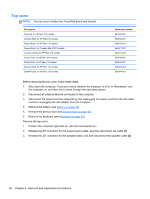
Rotate the keyboard over onto the palm rest, for the keyboard cable, and then disconnect
 |
View all HP Mini 210-3060ca manuals
Add to My Manuals
Save this manual to your list of manuals |
Page 62 highlights
3. Position the computer on its side. Using a screwdriver or a similar tool, push firmly through the bottom of the base enclosure (1) to release the keyboard (2). NOTE: Extra effort may be required to release the keyboard. 4. Position the computer right-side up. 5. Rotate the keyboard over onto the palm rest (1). 6. Release the zero insertion force (ZIF) connector (2) for the keyboard cable, and then disconnect the cable (3) from the system board. 54 Chapter 4 Removal and replacement procedures
-
 1
1 -
2
-
3
-
4
-
5
-
6
-
7
-
8
-
9
-
10
-
11
-
12
-
13
-
14
-
15
-
16
-
17
-
18
-
19
-
20
-
21
-
22
-
23
-
24
-
25
-
26
-
27
-
28
-
29
-
30
-
31
-
32
-
33
-
34
-
35
-
36
-
37
-
38
-
39
-
40
-
41
-
42
-
43
-
44
-
45
-
46
-
47
-
48
-
49
-
50
-
51
-
52
-
53
-
54
-
55
-
56
-
 57
57 -
 58
58 -
 59
59 -
 60
60 -
 61
61 -
 62
62 -
 63
63 -
 64
64 -
 65
65 -
 66
66 -
 67
67 -
68
-
69
-
70
-
71
-
72
-
73
-
74
-
75
-
76
-
77
-
78
-
79
-
80
-
81
-
82
-
83
-
84
-
85
-
86
-
87
-
88
-
89
-
90
-
91
-
92
-
93
-
94
-
95
-
96
-
97
-
98
-
99
-
100
-
101
-
102
-
103
-
104
 |
 |

3.
Position the computer on its side. Using a screwdriver or a similar tool, push firmly through the
bottom of the base enclosure
(1)
to release the keyboard
(2)
.
NOTE:
Extra effort may be required to release the keyboard.
4.
Position the computer right-side up.
5.
Rotate the keyboard over onto the palm rest
(1)
.
6.
Release the zero insertion force (ZIF) connector
(2)
for the keyboard cable, and then disconnect
the cable
(3)
from the system board.
54
Chapter 4
Removal and replacement procedures