HP Mini 210-3060ca HP Mini 210, HP Mini 110, and Compaq Mini CQ10 Maintenance - Page 74
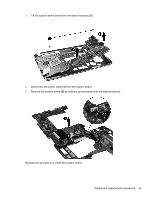
To remove the display/webcam cable assembly, disconnect the display cable
 |
View all HP Mini 210-3060ca manuals
Add to My Manuals
Save this manual to your list of manuals |
Page 74 highlights
7. To remove the display panel from the display enclosure, remove the 4 Phillips M2.0×4.0 screws (1) that secure the panel to the enclosure, lift the top of the display panel (2), and then rotate it up and out of the display enclosure. 8. To remove the display/webcam cable assembly, disconnect the display cable (1) from the connector (2) on the back of the display panel. 66 Chapter 4 Removal and replacement procedures
-
 1
1 -
2
-
3
-
4
-
5
-
6
-
7
-
8
-
9
-
10
-
11
-
12
-
13
-
14
-
15
-
16
-
17
-
18
-
19
-
20
-
21
-
22
-
23
-
24
-
25
-
26
-
27
-
28
-
29
-
30
-
31
-
32
-
33
-
34
-
35
-
36
-
37
-
38
-
39
-
40
-
41
-
42
-
43
-
44
-
45
-
46
-
47
-
48
-
49
-
50
-
51
-
52
-
53
-
54
-
55
-
56
-
57
-
58
-
59
-
60
-
61
-
62
-
63
-
64
-
65
-
66
-
67
-
68
-
 69
69 -
 70
70 -
 71
71 -
 72
72 -
 73
73 -
 74
74 -
 75
75 -
 76
76 -
 77
77 -
 78
78 -
 79
79 -
80
-
81
-
82
-
83
-
84
-
85
-
86
-
87
-
88
-
89
-
90
-
91
-
92
-
93
-
94
-
95
-
96
-
97
-
98
-
99
-
100
-
101
-
102
-
103
-
104
 |
 |

7.
To remove the display panel from the display enclosure, remove the 4 Phillips M2.0×4.0 screws
(1)
that secure the panel to the enclosure, lift the top of the display panel
(2)
, and then rotate it
up and out of the display enclosure.
8.
To remove the display/webcam cable assembly, disconnect the display cable
(1)
from the
connector
(2)
on the back of the display panel.
66
Chapter 4
Removal and replacement procedures