HP Nx9600 Hardware and Software Guide - Page 134
Replacing the Internal Hard Drive, Start > Help and, Support.
 |
View all HP Nx9600 manuals
Add to My Manuals
Save this manual to your list of manuals |
Page 134 highlights
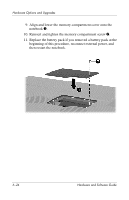
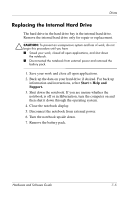
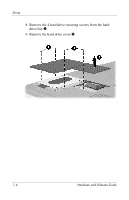
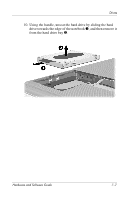
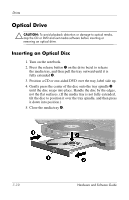
Drives Replacing the Internal Hard Drive The hard drive in the hard drive bay is the internal hard drive. Remove the internal hard drive only for repair or replacement. Ä CAUTION: To prevent an unresponsive system and loss of work, do not begin this procedure until you have ■ Saved your work, closed all open applications, and shut down the notebook. ■ Disconnected the notebook from external power and removed the battery pack. 1. Save your work and close all open applications. 2. Back up the data on your hard drive if desired. For back up information and instructions, select Start > Help and Support. 3. Shut down the notebook. If you are unsure whether the notebook is off or in Hibernation, turn the computer on and then shut it down through the operating system. 4. Close the notebook display. 5. Disconnect the notebook from external power. 6. Turn the notebook upside down. 7. Remove the battery pack. Hardware and Software Guide 7-5
-
 1
1 -
2
-
3
-
4
-
5
-
6
-
7
-
8
-
9
-
10
-
11
-
12
-
13
-
14
-
15
-
16
-
17
-
18
-
19
-
20
-
21
-
22
-
23
-
24
-
25
-
26
-
27
-
28
-
29
-
30
-
31
-
32
-
33
-
34
-
35
-
36
-
37
-
38
-
39
-
40
-
41
-
42
-
43
-
44
-
45
-
46
-
47
-
48
-
49
-
50
-
51
-
52
-
53
-
54
-
55
-
56
-
57
-
58
-
59
-
60
-
61
-
62
-
63
-
64
-
65
-
66
-
67
-
68
-
69
-
70
-
71
-
72
-
73
-
74
-
75
-
76
-
77
-
78
-
79
-
80
-
81
-
82
-
83
-
84
-
85
-
86
-
87
-
88
-
89
-
90
-
91
-
92
-
93
-
94
-
95
-
96
-
97
-
98
-
99
-
100
-
101
-
102
-
103
-
104
-
105
-
106
-
107
-
108
-
109
-
110
-
111
-
112
-
113
-
114
-
115
-
116
-
117
-
118
-
119
-
120
-
121
-
122
-
123
-
124
-
125
-
126
-
127
-
128
-
 129
129 -
 130
130 -
 131
131 -
 132
132 -
 133
133 -
 134
134 -
 135
135 -
 136
136 -
 137
137 -
 138
138 -
 139
139 -
140
-
141
-
142
-
143
-
144
-
145
-
146
-
147
-
148
-
149
-
150
-
151
-
152
-
153
-
154
-
155
-
156
-
157
-
158
-
159
-
160
-
161
-
162
-
163
-
164
-
165
-
166
-
167
-
168
-
169
-
170
-
171
-
172
-
173
-
174
-
175
-
176
-
177
-
178
-
179
-
180
-
181
-
182
-
183
-
184
-
185
-
186
-
187
-
188
-
189
-
190
-
191
-
192
-
193
-
194
-
195
-
196
-
197
-
198
-
199
 |
 |