HP Officejet Pro X476 HP Officejet X Series - Software Technical Reference - Page 26
Paper size, Custom, Paper source, Automatically select, Unspecified, Type Is, Special s, Settings
 |
View all HP Officejet Pro X476 manuals
Add to My Manuals
Save this manual to your list of manuals |
Page 26 highlights
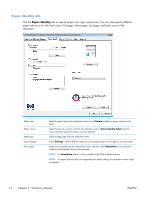
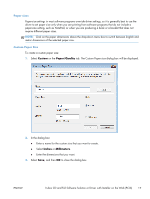
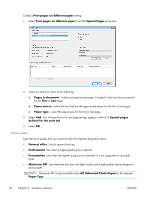
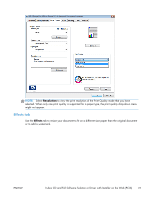
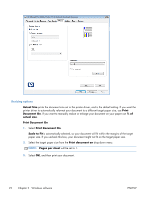
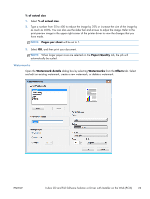
4. Close the printer properties, and then open printer properties again. NOTE: The printer properties must be closed and reopened to access your new custom paper size. 5. From the Paper size drop-down menu select the paper size that you created. NOTE: If you want to view the dimensions of a custom paper size that you created, select the name of the paper size from Paper size drop-down menu, and the select Custom Paper source Specify the source tray for printing a document with the Paper source drop-down menu. Available trays will vary by printer. Automatically select is the default setting. When this setting is selected, the printer uses the source tray that supports the paper size that you have selected. If you select a source tray other than Automatically select, make sure that the correct paper size is loaded in the source tray. Paper type The default setting is Unspecified. If you select a paper type other than Unspecified, make sure that the correct paper type is loaded in the selected Paper source tray. You can choose specific paper types by selecting More, and then selecting a specific paper type in one of the categories under Type Is. Special pages Open the Special Pages dialog box by selecting Settings from the Paper/Quality tab. ● If you want to add a blank cover or a preprinted cover to a document, use the Covers setting. Use this setting for covers that are not pages within your document. ● If you want to use a different paper type for the first and/or last page of your document use the Print pages on different paper setting. 18 Chapter 2 Windows software ENWW
-
 1
1 -
2
-
3
-
4
-
5
-
6
-
7
-
8
-
9
-
10
-
11
-
12
-
13
-
14
-
15
-
16
-
17
-
18
-
19
-
20
-
 21
21 -
 22
22 -
 23
23 -
 24
24 -
 25
25 -
 26
26 -
 27
27 -
 28
28 -
 29
29 -
 30
30 -
 31
31 -
32
-
33
-
34
-
35
-
36
-
37
-
38
-
39
-
40
-
41
-
42
-
43
-
44
-
45
-
46
-
47
-
48
-
49
-
50
-
51
-
52
-
53
-
54
-
55
-
56
-
57
-
58
-
59
-
60
-
61
-
62
-
63
-
64
-
65
-
66
-
67
-
68
-
69
-
70
 |
 |