HP Officejet v40 HP Officejet V Series - (English) User Guide - Page 16
&kdqjh²wkh²sdshu²vl]h, Rdg²ruljlqdov - printer
 |
View all HP Officejet v40 manuals
Add to My Manuals
Save this manual to your list of manuals |
Page 16 highlights
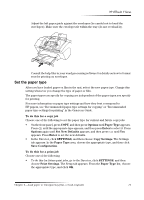
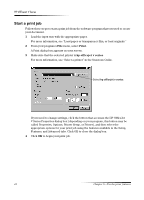
HP OfficeJet V Series • To do this for the current print job, open the document that you want to print. From the File menu, choose Print, Print Setup, or Page Setup. Make sure that the selected printer is hp officejet v series, and then click Properties, Options, Printer Setup, or Printer. The Setup tab appears. From the Paper Type list, choose the appropriate type, and then click OK. &KDQJH WKH SDSHU VL]H The unit lets you change the paper size for copying and faxing. (For printing, you set the paper size using the HP OfficeJet V Series Properties dialog box. For more information, see "Recommended paper-size settings for printing.") Your change remains in effect until you change it again. To switch to a different paper size, do the following: To do this using the front panel 1 Choose one of the following: • To change the size for a copy job, press COPY, press Options until Paper Size appears. • To change the size for a fax job, press Setup, press Options, press until 3:Basic Fax Setup appears, and then press Enter to select it. After 1:Date and Time appears, press until 4:Paper Size appears, and then press Enter to select it. 2 Press until the desired paper size appears, and then press Enter to select it. To do this using the PC 1 In the Director, click SETTINGS, and then choose one of the following: • To change the size for a copy job, choose Copy Settings. The Settings tab appears. In the Loaded Paper Size area, choose the desired paper size. • To change the size for a fax job, choose Fax Settings, and then choose Receive Settings. The Receiving tab appears. In the Loaded Paper Size area, choose the desired paper size. 2 Click OK to store your changes and close the dialog box. /RDG RULJLQDOV If you are working with originals that are printed on 16-24 lb. (60-90 gsm) plain paper or HP Premium Inkjet Paper, you can load more than one in the automatic document feeder (ADF). If you are working with photos or originals of an odd size (no smaller than 3.25-by-3.25 inches or 82-by-82 millimeters), load them in the ADF one at a time. When working with fragile, torn, or odd-sized originals, we recommend that you use a document sleeve or sheet protector (available from most office-product stores) for the original. Place a single sleeve into the ADF with the sealed edge first and the transparent side down. If you have trouble with originals feeding incorrectly, make sure the front edge of the ADF tray is snapped into position. 12 Chapter 4-Load paper or transparency film, or load originals
-
 1
1 -
2
-
3
-
4
-
5
-
6
-
7
-
8
-
9
-
10
-
 11
11 -
 12
12 -
 13
13 -
 14
14 -
 15
15 -
 16
16 -
 17
17 -
 18
18 -
 19
19 -
 20
20 -
 21
21 -
22
-
23
-
24
-
25
-
26
-
27
-
28
-
29
-
30
-
31
-
32
-
33
-
34
-
35
-
36
-
37
-
38
-
39
-
40
-
41
-
42
-
43
-
44
-
45
-
46
-
47
-
48
-
49
-
50
-
51
-
52
-
53
-
54
-
55
-
56
 |
 |