HP OmniBook 2000 HP OmniBook Hardware Diagnostics - Page 12
Starting OmniBook Hardware Diagnostics
 |
View all HP OmniBook 2000 manuals
Add to My Manuals
Save this manual to your list of manuals |
Page 12 highlights
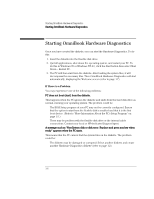
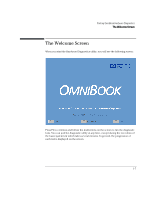
Starting OmniBook Hardware Diagnostics Starting OmniBook Hardware Diagnostics Starting OmniBook Hardware Diagnostics Once you have created the diskette, you can start the Hardware Diagnostics. To do this: 1. Insert the diskette into the flexible disk drive. 2. Quit all applications, shut down the operating system, and restart your PC. To do this in Windows 95 or Windows NT 4.0, click the Start button then select Shut Down - Restart PC. 3. The PC will then start from the diskette. After loading the system files, it will decompress the necessary files. Then OmniBook Hardware Diagnostics will start automatically, displaying the Welcome screen (refer to page 1-7). If There is a Problem You may experience one of the following problems: PC does not boot (start) from the diskette. This happens when the PC ignores the diskette and starts from the hard disk drive as normal, running your operating system. The problem could be: • The BIOS Setup program of your PC may not be correctly configured. Ensure that the option to start from the flexible disk is enabled and that it is the first boot device. (Refer to "More Information About the PC's Setup Program" on page 1-5.) • There may be problem with the flexible disk drive or the internal cable connections. Contact your local or HP-dedicated Support Agent. A message such as "Non-System disk or disk error. Replace and press any key when ready" appears when the PC starts. This means that the PC cannot find the system files on the diskette. The problem could be: • The diskette may be damaged or corrupted. Select another diskette and create another Hardware Diagnostics diskette (refer to page 1-2). 1-6
-
 1
1 -
2
-
3
-
4
-
5
-
6
-
 7
7 -
 8
8 -
 9
9 -
 10
10 -
 11
11 -
 12
12 -
 13
13 -
 14
14 -
 15
15 -
 16
16 -
 17
17 -
18
-
19
-
20
-
21
-
22
-
23
-
24
-
25
-
26
-
27
-
28
-
29
-
30
-
31
-
32
-
33
-
34
-
35
-
36
-
37
-
38
-
39
-
40
-
41
-
42
 |
 |
