HP Photosmart 715 HP Photosmart 715 Digital Camera - User Guide - Page 34
Changing the date and time
 |
View all HP Photosmart 715 manuals
Add to My Manuals
Save this manual to your list of manuals |
Page 34 highlights
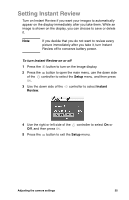
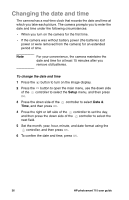
Changing the date and time The camera has a real-time clock that records the date and time at which you take each picture. The camera prompts you to enter the date and time under the following circumstances: When you turn on the camera for the first time. If the camera was without battery power (the batteries lost power or were removed from the camera) for an extended period of time. Note For your convenience, the camera maintains the date and time for at least 15 minutes after you remove old batteries. To change the date and time 1 Press the button to turn on the image display. 2 Press the button to open the main menu, use the down side of the controller to select the Setup menu, and then press OK. 3 Press the down side of the controller to select Date & Time, and then press OK. 4 Press the right or left side of the controller to set the day, and then press the down side of the controller to select the next field. 5 Set the month, year, hour, minute, and date format using the controller, and then press OK. 6 To confirm the date and time, press OK. 26 HP photosmart 715 user guide
-
 1
1 -
2
-
3
-
4
-
5
-
6
-
7
-
8
-
9
-
10
-
11
-
12
-
13
-
14
-
15
-
16
-
17
-
18
-
19
-
20
-
21
-
22
-
23
-
24
-
25
-
26
-
27
-
28
-
 29
29 -
 30
30 -
 31
31 -
 32
32 -
 33
33 -
 34
34 -
 35
35 -
 36
36 -
 37
37 -
 38
38 -
 39
39 -
40
-
41
-
42
-
43
-
44
-
45
-
46
-
47
-
48
-
49
-
50
-
51
-
52
-
53
-
54
-
55
-
56
-
57
-
58
-
59
-
60
-
61
-
62
-
63
-
64
-
65
-
66
-
67
-
68
-
69
-
70
-
71
-
72
-
73
-
74
-
75
-
76
-
77
-
78
-
79
-
80
-
81
-
82
-
83
-
84
 |
 |