HP Photosmart C4100 Basics Guide - Page 16
Replace the print cartridges, Print, Printer Toolbox, Print Properties - ink cartridge
 |
View all HP Photosmart C4100 manuals
Add to My Manuals
Save this manual to your list of manuals |
Page 16 highlights
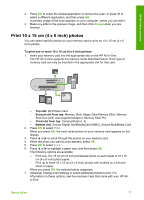
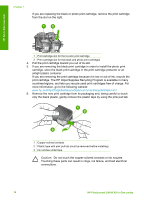
HP All-in-One overview 7. Change the print settings for each option in the pop-up menu, as appropriate for your project. 8. Click Print to begin printing. Replace the print cartridges Follow these instructions when the ink level is low. Note 1 When the ink level for the print cartridge is low, a message appears on the display. You can also check the ink levels by using the HP Photosmart Mac Software on your computer. Note 2 When the ink level for the print cartridge is low, a message appears on the display. You can also check the ink levels by using the Printer Toolbox available through the HP Photosmart Software on your computer or through the Print Properties dialog box on your computer. When you receive a low-ink warning message on the display, make sure you have a replacement print cartridge available. You should also replace the print cartridges when you see faded text or if you experience print quality issues related to the print cartridges. To order print cartridges for the HP All-in-One, go to www.hp.com/learn/suresupply. If prompted, choose your country/region, follow the prompts to select your product, and then click one of the shopping links on the page. Tip You can also use these instructions to replace the black print cartridge with a photo print cartridge for printing high-quality color photos. To replace the print cartridges 1. Make sure the HP All-in-One is on. Caution If the HP All-in-One is off when you open the print cartridge door to access the print cartridges, the HP All-in-One will not release the cartridges for changing. You might damage the HP All-in-One if the print cartridges are not docked safely when you try to remove them. 2. Open the print cartridge door. The print carriage moves to the far right side of the HP All-in-One. 1 Print cartridge door 2 Print carriage 3. Wait until the print carriage is idle and silent, and then lightly press down on a print cartridge to release it. If you are replacing the tri-color print cartridge, remove the print cartridge from the slot on the left. Basics Guide 13
-
 1
1 -
2
-
3
-
4
-
5
-
6
-
7
-
8
-
9
-
10
-
 11
11 -
 12
12 -
 13
13 -
 14
14 -
 15
15 -
 16
16 -
 17
17 -
 18
18 -
 19
19 -
 20
20 -
 21
21 -
22
-
23
-
24
-
25
-
26
-
27
-
28
-
29
-
30
-
31
-
32
-
33
-
34
 |
 |
