HP Photosmart C7100 Setup Guide - Page 11
Choose ONE wireless network option A or B, Establish the wireless connection - wireless setup
 |
View all HP Photosmart C7100 manuals
Add to My Manuals
Save this manual to your list of manuals |
Page 11 highlights
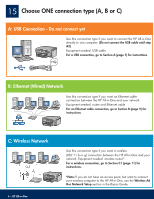
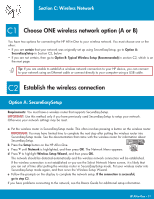
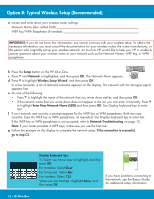
Section C: Wireless Network C1 Choose ONE wireless network option (A or B) You have two options for connecting the HP All-in-One to your wireless network. You must choose one or the other: • If you are certain that your network was originally set up using SecureEasySetup, go to Option A: SecureEasySetup in Section C2, below. • If you are not certain, then go to Option B: Typical Wireless Setup (Recommended) in section C2, which is on the next page. Tip: If you are unable to establish a wireless network connection to your HP device, you can connect to your network using an Ethernet cable or connect directly to your computer using a USB cable. C2 Establish the wireless connection Option A: SecureEasySetup Requirements: You must have a wireless router that supports SecureEasySetup. IMPORTANT: Use this method only if you have previously used SecureEasySetup to setup your network. Otherwise your network settings may be reset. a Put the wireless router in SecureEasySetup mode. This often involves pressing a button on the wireless router. IMPORTANT: You may have limited time to complete the next step after putting the wireless router into SecureEasySetup mode. See the documentation that came with the wireless router for information about SecureEasySetup. b Press the Setup button on the HP All-in-One. c Press until Network is highlighted, and then press OK. The Network Menu appears. d Press to highlight Wireless Setup Wizard, and then press OK. The network should be detected automatically and the wireless network connection will be established. If the wireless connection is not established or you see the Select Network Name screen, it is likely that you ran out of time after putting the wireless router in SecureEasySetup mode. Put your wireless router into SecureEasySetup mode again, and then rerun the Wireless Setup Wizard. e Follow the prompts on the display to complete the network setup. If the connection is successful, go to step C3. If you have problems connecting to the network, see the Basics Guide for additional setup information. HP All-in-One • 11
-
 1
1 -
2
-
3
-
4
-
5
-
 6
6 -
 7
7 -
 8
8 -
 9
9 -
 10
10 -
 11
11 -
 12
12 -
 13
13 -
 14
14 -
 15
15 -
 16
16
 |
 |
