HP Photosmart C7100 Setup Guide - Page 2
Load photo paper, Attach the control panel faceplate, if not attached, Load plain paper into
 |
View all HP Photosmart C7100 manuals
Add to My Manuals
Save this manual to your list of manuals |
Page 2 highlights
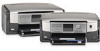
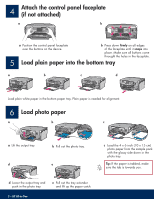
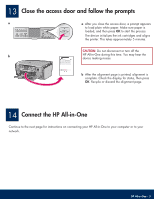
4 Attach the control panel faceplate (if not attached) a b a Position the control panel faceplate over the buttons on the device. b Press down firmly on all edges of the faceplate until it snaps into place. Make sure all buttons come throught the holes in the faceplate. 5 Load plain paper into the bottom tray a b c d Load plain white paper in the bottom paper tray. Plain paper is needed for alignment. 6 Load photo paper a b c a Lift the output tray. d b Pull out the photo tray. e c Load the 4 x 6 inch (10 x 15 cm) photo paper from the sample pack with the glossy side down in the photo tray. Tip: If the paper is tabbed, make sure the tab is towards you. d Lower the output tray and push in the photo tray. e Pull out the tray extender and lift up the paper catch. 2 • HP All-in-One
-
 1
1 -
 2
2 -
 3
3 -
 4
4 -
 5
5 -
 6
6 -
 7
7 -
 8
8 -
9
-
10
-
11
-
12
-
13
-
14
-
15
-
16
 |
 |
