HP Presario SA4000 Getting Started Guide - Page 48
Storing Files on a DVD or CD
 |
View all HP Presario SA4000 manuals
Add to My Manuals
Save this manual to your list of manuals |
Page 48 highlights
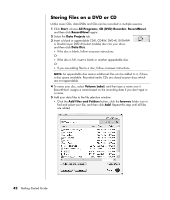
Storing Files on a DVD or CD Unlike music CDs, data DVDs and CDs can be recorded in multiple sessions. 1 Click Start, choose All Programs, CD (DVD) Recorder, RecordNow!, and then click RecordNow! again. 2 Select the Data Projects tab. 3 Insert a blank or appendable CD-R, CD-RW, DVD+R, DVD+RW or Double Layer DVD+R (select models) disc into your drive, and then click Data Disc. • If the disc is blank, follow onscreen instructions. Or • If the disc is full, insert a blank or another appendable disc. Or • If you are adding files to a disc, follow onscreen instructions. NOTE: An appendable disc means additional files can be added to it, if there is disc space available. Recorded audio CDs are closed session discs which are not appendable. 4 To name your disc, select Volume Label, and then type a name over it. RecordNow! assigns a name based on the recording date if you don't type in a name. 5 Add your data files to the file selection window: • Click the Add Files and Folders button, click the browse folder icon to find and select your file, and then click Add. Repeat this step until all files are added. 42 Getting Started Guide
-
 1
1 -
2
-
3
-
4
-
5
-
6
-
7
-
8
-
9
-
10
-
11
-
12
-
13
-
14
-
15
-
16
-
17
-
18
-
19
-
20
-
21
-
22
-
23
-
24
-
25
-
26
-
27
-
28
-
29
-
30
-
31
-
32
-
33
-
34
-
35
-
36
-
37
-
38
-
39
-
40
-
41
-
42
-
 43
43 -
 44
44 -
 45
45 -
 46
46 -
 47
47 -
 48
48 -
 49
49 -
 50
50 -
 51
51 -
 52
52 -
 53
53 -
54
-
55
-
56
-
57
-
58
-
59
-
60
-
61
-
62
-
63
-
64
-
65
-
66
-
67
-
68
-
69
-
70
-
71
-
72
-
73
-
74
-
75
-
76
-
77
-
78
-
79
-
80
-
81
-
82
-
83
-
84
-
85
-
86
 |
 |
