HP Presario SA4000 Getting Started Guide - Page 52
Saving an Image, Burning an Image, About Recording Video Files, Disc Labels, Creating Recovery CD/
 |
View all HP Presario SA4000 manuals
Add to My Manuals
Save this manual to your list of manuals |
Page 52 highlights
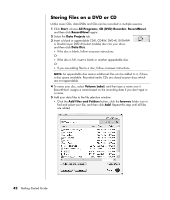
Saving an Image 1 Click Start, choose All Programs, CD (DVD) Recorder, RecordNow!, and then click RecordNow! again. 2 Select the Backup Projects tab. 3 Select Save Image. 4 Insert the source disc into the drive. 5 Click Browse to set the destination and name of the image file. 6 Click the Save icon to create the image file. Burning an Image 1 Click Start, choose All Programs, CD (DVD) Recorder, RecordNow!, and then click RecordNow! again. 2 Select the Backup Projects tab. 3 Select Burn Image. 4 Click the Browse button to locate your saved image file. 5 Click the Burn icon. 6 Insert a blank CD or DVD into the drive. 7 Click Done when recording is complete. About Recording Video Files Video quality depends on the quality of the source files, the PC speed, and its graphics processing ability. Refer to the "Recording VHS Video Files Direct to DVD" section on page 64 of this guide. NOTE: Your DVD Writer or CD Writer drive will not copy commercially available DVD movies. Most commercial DVDs are encoded to prevent unauthorized duplication. Disc Labels WARNING: When labeling your DVDs, do not use sticky labels. They can cause the DVD to play erratically. Instead, write on the DVD with a felt tip pen to label it. Creating Recovery CD/DVDs for the PC For more information about creating Recovery CDs/DVDs, refer to the Warranty and Support Guide that came with your PC. 46 Getting Started Guide
-
 1
1 -
2
-
3
-
4
-
5
-
6
-
7
-
8
-
9
-
10
-
11
-
12
-
13
-
14
-
15
-
16
-
17
-
18
-
19
-
20
-
21
-
22
-
23
-
24
-
25
-
26
-
27
-
28
-
29
-
30
-
31
-
32
-
33
-
34
-
35
-
36
-
37
-
38
-
39
-
40
-
41
-
42
-
43
-
44
-
45
-
46
-
 47
47 -
 48
48 -
 49
49 -
 50
50 -
 51
51 -
 52
52 -
 53
53 -
 54
54 -
 55
55 -
 56
56 -
 57
57 -
58
-
59
-
60
-
61
-
62
-
63
-
64
-
65
-
66
-
67
-
68
-
69
-
70
-
71
-
72
-
73
-
74
-
75
-
76
-
77
-
78
-
79
-
80
-
81
-
82
-
83
-
84
-
85
-
86
 |
 |
