HP ProBook 4340s HP ProBook 4340s Notebook PC HP ProBook 4341s Notebook PC - M - Page 72
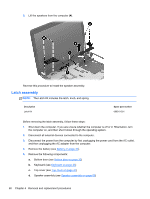
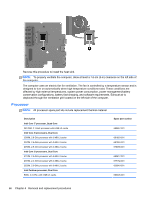
from the system board., To remove the discrete heat sink, disconnect the fan cable
 |
View all HP ProBook 4340s manuals
Add to My Manuals
Save this manual to your list of manuals |
Page 72 highlights
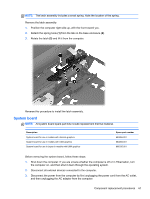
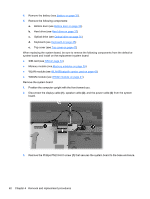
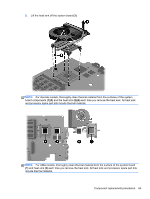
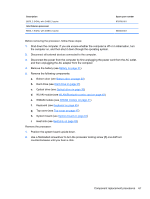
e. WWAN module (see WWAN module on page 41) f. Keyboard (see Keyboard on page 45) g. Top cover (see Top cover on page 47) h. System board (see System board on page 61) Remove the heat sink: 1. Position the system board upside-down with the front toward you. 2. To remove the UMA heat sink, skip to step 6. 3. To remove the discrete heat sink, disconnect the fan cable (1) from the system board. 4. Loosen the six captive Phillips screws (2) that secure the heat sink to the system board. 5. Lift the heat sink off the system board (3). 6. To remove the UMA heat sink, disconnect the fan cable (1) from the system board. 7. Loosen the four captive Phillips screws (2) that secure the heat sink to the system board. 64 Chapter 4 Removal and replacement procedures
-
 1
1 -
2
-
3
-
4
-
5
-
6
-
7
-
8
-
9
-
10
-
11
-
12
-
13
-
14
-
15
-
16
-
17
-
18
-
19
-
20
-
21
-
22
-
23
-
24
-
25
-
26
-
27
-
28
-
29
-
30
-
31
-
32
-
33
-
34
-
35
-
36
-
37
-
38
-
39
-
40
-
41
-
42
-
43
-
44
-
45
-
46
-
47
-
48
-
49
-
50
-
51
-
52
-
53
-
54
-
55
-
56
-
57
-
58
-
59
-
60
-
61
-
62
-
63
-
64
-
65
-
66
-
 67
67 -
 68
68 -
 69
69 -
 70
70 -
 71
71 -
 72
72 -
 73
73 -
 74
74 -
 75
75 -
 76
76 -
 77
77 -
78
-
79
-
80
-
81
-
82
-
83
-
84
-
85
-
86
-
87
-
88
-
89
-
90
-
91
-
92
-
93
-
94
-
95
-
96
-
97
-
98
-
99
-
100
-
101
-
102
-
103
-
104
-
105
-
106
-
107
-
108
-
109
-
110
-
111
-
112
-
113
-
114
-
115
-
116
-
117
 |
 |