HP ProLiant BL420c HP ProLiant BL420c Gen8 Server Blade User Guide - Page 25
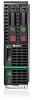
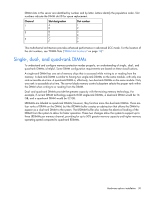
Open each of the processor locking levers in the order indicated
 |
View all HP ProLiant BL420c manuals
Add to My Manuals
Save this manual to your list of manuals |
Page 25 highlights
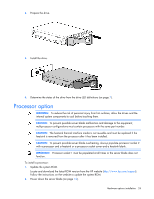
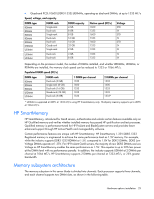
3. Remove the server blade (on page 13). 4. Remove the access panel (on page 14). 5. Disconnect the capacitor pack cabling, if connected ("FBWC capacitor pack cabling" on page 46). 6. Remove the SAS controller (on page 14). 7. Remove the heatsink blank. Retain the heatsink blank for future use. 8. Open each of the processor locking levers in the order indicated, and then open the processor retaining bracket. Hardware options installation 25
-
 1
1 -
2
-
3
-
4
-
5
-
6
-
7
-
8
-
9
-
10
-
11
-
12
-
13
-
14
-
15
-
16
-
17
-
18
-
19
-
 20
20 -
 21
21 -
 22
22 -
 23
23 -
 24
24 -
 25
25 -
 26
26 -
 27
27 -
 28
28 -
 29
29 -
 30
30 -
31
-
32
-
33
-
34
-
35
-
36
-
37
-
38
-
39
-
40
-
41
-
42
-
43
-
44
-
45
-
46
-
47
-
48
-
49
-
50
-
51
-
52
-
53
-
54
-
55
-
56
-
57
-
58
-
59
-
60
-
61
-
62
-
63
-
64
-
65
-
66
-
67
-
68
-
69
-
70
-
71
-
72
-
73
-
74
-
75
-
76
-
77
-
78
-
79
-
80
-
81
-
82
-
83
-
84
-
85
-
86
-
87
-
88
 |
 |
Hardware options installation 25
3.
Remove the server blade (on page
13
).
4.
Remove the access panel (on page
14
).
5.
Disconnect the capacitor pack cabling, if connected ("
FBWC capacitor pack cabling
" on page
46
).
6.
Remove the SAS controller (on page
14
).
7.
Remove the heatsink blank. Retain the heatsink blank for future use.
8.
Open each of the processor locking levers in the order indicated, and then open the processor retaining
bracket.