HP ProLiant ML10 HP ProLiant ML10 Server User Guide - Page 28
Install the drive carrier into the server, Place the drive carrier
 |
View all HP ProLiant ML10 manuals
Add to My Manuals
Save this manual to your list of manuals |
Page 28 highlights
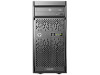
To avoid drive carrier interference, tuck the two cables underneath the flanges of the drive bracket. 15. Insert the LFF drives into the drive carrier, the open end of the drive carrier should be facing down and the drive stickers should be facing up, and then secure each drive by tightening two T-15 6-32 screws on either side of the drive carrier for each drive installed. Be sure to install each drive with the sticker facing up and the connectors facing toward the rear. 16. Install the drive carrier into the server: a. Place the drive carrier, with the open end of the drive carrier facing up, on the drive bracket. Hardware options installation 28
-
 1
1 -
2
-
3
-
4
-
5
-
6
-
7
-
8
-
9
-
10
-
11
-
12
-
13
-
14
-
15
-
16
-
17
-
18
-
19
-
20
-
21
-
22
-
 23
23 -
 24
24 -
 25
25 -
 26
26 -
 27
27 -
 28
28 -
 29
29 -
 30
30 -
 31
31 -
 32
32 -
 33
33 -
34
-
35
-
36
-
37
-
38
-
39
-
40
-
41
-
42
-
43
-
44
-
45
-
46
-
47
-
48
-
49
-
50
-
51
-
52
-
53
-
54
-
55
-
56
-
57
-
58
-
59
-
60
-
61
-
62
-
63
-
64
-
65
-
66
-
67
-
68
-
69
-
70
-
71
-
72
-
73
-
74
-
75
-
76
 |
 |

Hardware options installation 28
To avoid drive carrier interference, tuck the two cables underneath the flanges of the drive bracket.
15.
Insert the LFF drives into the drive carrier, the open end of the drive carrier should be facing down and
the drive stickers should be facing up, and then secure each drive by tightening two T-15 6-32 screws
on either side of the drive carrier for each drive installed.
Be sure to install each drive with the sticker facing up and the connectors facing toward the rear.
16.
Install the drive carrier into the server:
a.
Place the drive carrier, with the open end of the drive carrier facing up, on the drive bracket.