HP ProLiant SL4545 HP ProLiant SL4500 Series Setup and Installation Guide - Page 21
CAUTION, IMPORTANT, Lift and remove the access panel.
 |
View all HP ProLiant SL4545 manuals
Add to My Manuals
Save this manual to your list of manuals |
Page 21 highlights
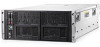
e. Node CAUTION: To avoid damage to the device, do not use the removal handle to carry it. 2. Remove the access panel: a. Release the access panel latch. b. Slide the access panel back about 1.5 cm (0.5 in). c. Lift and remove the access panel. 3. Remove all drives: IMPORTANT: Labels are provided so that you can label the drives before installing them. If drives are removed, they must be returned to their original locations. a. Release the handle. Installation 21
-
 1
1 -
2
-
3
-
4
-
5
-
6
-
7
-
8
-
9
-
10
-
11
-
12
-
13
-
14
-
15
-
 16
16 -
 17
17 -
 18
18 -
 19
19 -
 20
20 -
 21
21 -
 22
22 -
 23
23 -
 24
24 -
 25
25 -
 26
26 -
27
-
28
-
29
-
30
-
31
-
32
-
33
-
34
-
35
-
36
-
37
-
38
-
39
-
40
-
41
-
42
-
43
-
44
-
45
-
46
-
47
-
48
-
49
-
50
-
51
-
52
-
53
-
54
-
55
-
56
-
57
-
58
-
59
-
60
-
61
-
62
-
63
-
64
 |
 |

Installation 21
e.
Node
CAUTION:
To avoid damage to the device, do not use the removal handle to carry it.
2.
Remove the access panel:
a.
Release the access panel latch.
b.
Slide the access panel back about 1.5 cm (0.5 in).
c.
Lift and remove the access panel.
3.
Remove all drives:
IMPORTANT:
Labels are provided so that you can label the drives before installing them. If drives
are removed, they must be returned to their original locations.
a.
Release the handle.