HP ProLiant SL4545 HP ProLiant SL4500 Series Setup and Installation Guide - Page 6
Space and airflow requirements
 |
View all HP ProLiant SL4545 manuals
Add to My Manuals
Save this manual to your list of manuals |
Page 6 highlights
WARNING: To reduce the risk of personal injury or damage to equipment, heed all warnings and cautions throughout the installation instructions. WARNING: To reduce the risk of personal injury or damage to the equipment, be sure that: • The rack is bolted to the floor using the concrete anchor kit. • The leveling feet extend to the floor. • The full weight of the rack rests on the leveling feet. • The racks are coupled together in multiple rack installations. • Only one component is extended at a time. If more than one component is extended, a rack might become unstable. WARNING: The chassis is very heavy. To reduce the risk of personal injury or damage to the equipment: • Observe local occupational health and safety requirements and guidelines for manual material handling. • Remove all installed components from the chassis before installing or moving the chassis. • Use caution and get help to lift and stabilize the chassis during installation or removal, especially when the chassis is not fastened to the rack. WARNING: To reduce the risk of personal injury or damage to the equipment, you must adequately support the chassis during installation and removal. WARNING: Always use at least two people to lift the chassis into the rack. If the chassis is being loaded into the rack above chest level, a third person must assist with aligning the chassis with the rails while the other two people support the weight of the chassis. WARNING: Be sure to install enclosures starting from the bottom of the rack and work your way up the rack. WARNING: To reduce the risk of personal injury from hot surfaces, allow the drives and the internal system components to cool before touching them. WARNING: To reduce the risk of electric shock or damage to the equipment: • Never reach inside the chassis while the system is powered up. • Perform service on system components only as instructed in the user documentation. CAUTION: Always be sure that equipment is properly grounded and that you follow proper grounding procedures before beginning any installation procedure. Improper grounding can result in ESD damage to electronic components. For more information, refer to, "Electrostatic discharge (on page 44)." CAUTION: When performing non-hot-plug operations, you must power down the node and/or the system. However, it may be necessary to leave the node powered up when performing other operations, such as hot-plug installations or troubleshooting. Space and airflow requirements To enable servicing and ensure adequate airflow, observe the following spatial requirements when deciding where to install a rack: Planning the installation 6
-
 1
1 -
 2
2 -
 3
3 -
 4
4 -
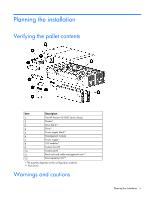 5
5 -
 6
6 -
 7
7 -
 8
8 -
 9
9 -
 10
10 -
 11
11 -
 12
12 -
13
-
14
-
15
-
16
-
17
-
18
-
19
-
20
-
21
-
22
-
23
-
24
-
25
-
26
-
27
-
28
-
29
-
30
-
31
-
32
-
33
-
34
-
35
-
36
-
37
-
38
-
39
-
40
-
41
-
42
-
43
-
44
-
45
-
46
-
47
-
48
-
49
-
50
-
51
-
52
-
53
-
54
-
55
-
56
-
57
-
58
-
59
-
60
-
61
-
62
-
63
-
64
 |
 |
