HP ProLiant SL4545 HP ProLiant SL4500 Series Setup and Installation Guide - Page 23
Warning, Caution
 |
View all HP ProLiant SL4545 manuals
Add to My Manuals
Save this manual to your list of manuals |
Page 23 highlights
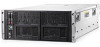
You can install up to three chassis in a 36U rack. If you are installing more than one chassis, install the first chassis in the bottom of the rack, and then install additional chassis by moving up the rack with each subsequent chassis. Plan rack installation carefully, because it is difficult to change the location of components after they are installed. WARNING: To reduce the risk of personal injury or damage to the equipment, be sure that: • The rack is bolted to the floor using the concrete anchor kit. • The leveling feet extend to the floor. • The full weight of the rack rests on the leveling feet. • The racks are coupled together in multiple rack installations. • Only one component is extended at a time. If more than one component is extended, a rack might become unstable. WARNING: To reduce the risk of personal injury or equipment damage, be sure that the rack is adequately stabilized before installing the chassis. CAUTION: Be sure to keep the product parallel to the floor when installing the chassis. Tilting the product up or down could result in damage to the slides. To install the chassis: 1. Extend the rails. 2. Install the chassis into the J-slot on the rails, and then pull it forward. Installation 23
-
 1
1 -
2
-
3
-
4
-
5
-
6
-
7
-
8
-
9
-
10
-
11
-
12
-
13
-
14
-
15
-
16
-
17
-
 18
18 -
 19
19 -
 20
20 -
 21
21 -
 22
22 -
 23
23 -
 24
24 -
 25
25 -
 26
26 -
 27
27 -
 28
28 -
29
-
30
-
31
-
32
-
33
-
34
-
35
-
36
-
37
-
38
-
39
-
40
-
41
-
42
-
43
-
44
-
45
-
46
-
47
-
48
-
49
-
50
-
51
-
52
-
53
-
54
-
55
-
56
-
57
-
58
-
59
-
60
-
61
-
62
-
63
-
64
 |
 |
