HP ProLiant SL4545 HP ProLiant SL4500 Series Setup and Installation Guide - Page 22
Installing the chassis
 |
View all HP ProLiant SL4545 manuals
Add to My Manuals
Save this manual to your list of manuals |
Page 22 highlights
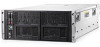
b. Remove the drive. Installing the chassis WARNING: Always use at least two people to lift the chassis into the rack. If the chassis is being loaded into the rack above chest level, a third person must assist with aligning the chassis with the rails while the other two people support the weight of the chassis. WARNING: The chassis is very heavy. To reduce the risk of personal injury or damage to the equipment: • Observe local occupational health and safety requirements and guidelines for manual material handling. • Remove all installed components from the chassis before installing or moving the chassis. • Use caution and get help to lift and stabilize the chassis during installation or removal, especially when the chassis is not fastened to the rack. WARNING: To avoid risk of personal injury or damage to the equipment, do not stack anything on top of rail-mounted equipment or use it as a work surface when extended from the rack. CAUTION: Always plan the rack installation so that the heaviest item is on the bottom of the rack. Install the heaviest item first, and continue to populate the rack from the bottom to the top. CAUTION: HP has not tested or validated the HP ProLiant SL4500 Series with any third-party racks. Before installing the HP ProLiant SL4500 Series in a third-party rack, be sure to properly scope the limitations of the rack. Before proceeding with the installation, consider the following: • You must fully understand the static and dynamic load carrying capacity of the rack and be sure that it can accommodate the weight of the HP ProLiant SL4500 Series. • Be sure sufficient clearance exists for cabling, installation and removal of the chassis, and actuation of the rack doors. The chassis requires installation in a rack. To install the rack rails, see the Quick Deploy Rail System Installation Instructions that ship with the rack hardware kit. Installation 22
-
 1
1 -
2
-
3
-
4
-
5
-
6
-
7
-
8
-
9
-
10
-
11
-
12
-
13
-
14
-
15
-
16
-
 17
17 -
 18
18 -
 19
19 -
 20
20 -
 21
21 -
 22
22 -
 23
23 -
 24
24 -
 25
25 -
 26
26 -
 27
27 -
28
-
29
-
30
-
31
-
32
-
33
-
34
-
35
-
36
-
37
-
38
-
39
-
40
-
41
-
42
-
43
-
44
-
45
-
46
-
47
-
48
-
49
-
50
-
51
-
52
-
53
-
54
-
55
-
56
-
57
-
58
-
59
-
60
-
61
-
62
-
63
-
64
 |
 |
