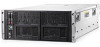
HP ProLiant SL4545 HP ProLiant SL4545 G7 Server Node User Guide - Page 19
Operations, Powering up the system, Power down the node, Remove a node from the chassis
 |
View all HP ProLiant SL4545 manuals
Add to My Manuals
Save this manual to your list of manuals |
Page 19 highlights
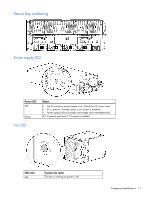
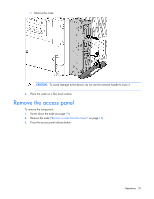
Operations Powering up the system 1. Connect the power cables to the power supplies. 2. Connect the power cables to the power source (UPS or wall outlet) or to an installed PDU. 3. Press the Power On/Standby button on the node. Power down the node Before powering down the node for any upgrade or maintenance procedures, perform a backup of critical server data and programs. IMPORTANT: When the node is in standby mode, auxiliary power is still being provided to the system. To power down the node, use one of the following methods: • Press and release the Power On/Standby button. This method initiates a controlled shutdown of applications and the OS before the node enters standby mode. • Press and hold the Power On/Standby button for more than 4 seconds to force the node to enter standby mode. This method forces the node to enter standby mode without properly exiting applications and the OS. If an application stops responding, you can use this method to force a shutdown. • Use a virtual power button selection through iLO. This method initiates a controlled remote shutdown of applications and the OS before the node enters standby mode. Before proceeding, verify the node is in standby mode by observing that the system power LED is amber. Remove a node from the chassis 1. Power down the node (on page 19). CAUTION: To avoid damage to the node, always support the bottom of the node when removing it from the chassis. 2. Remove the node from the chassis: a. Press the release button. b. Lower the handle. Operations 19
-
 1
1 -
2
-
3
-
4
-
5
-
6
-
7
-
8
-
9
-
10
-
11
-
12
-
13
-
 14
14 -
 15
15 -
 16
16 -
 17
17 -
 18
18 -
 19
19 -
 20
20 -
 21
21 -
 22
22 -
 23
23 -
 24
24 -
25
-
26
-
27
-
28
-
29
-
30
-
31
-
32
-
33
-
34
-
35
-
36
-
37
-
38
-
39
-
40
-
41
-
42
-
43
-
44
-
45
-
46
-
47
-
48
-
49
-
50
-
51
-
52
-
53
-
54
-
55
-
56
-
57
-
58
-
59
-
60
-
61
-
62
-
63
-
64
-
65
-
66
-
67
-
68
-
69
-
70
-
71
-
72
-
73
-
74
-
75
-
76
-
77
-
78
-
79
-
80
-
81
-
82
 |
 |
