HP ProLiant xw2x220c Administrator's Guide for Microsoft Windows on HP ProLian - Page 36
Optional software components, Creating the Windows XP-32 image
 |
View all HP ProLiant xw2x220c manuals
Add to My Manuals
Save this manual to your list of manuals |
Page 36 highlights
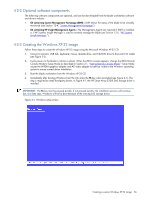
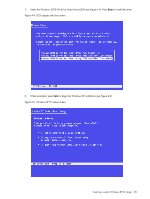
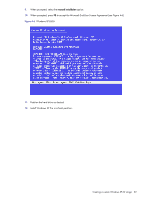
4-2-2 Optional software components The following software components are optional, and can be downloaded from the blade workstation software and drivers website: • CD containing System Management Homepage (SMH)-SMH allows the status of the blade to be remotely monitored (see Section 12-4, "System Management Homepage"). • CD containing HP Insight Management Agents-The Management Agents are required if SMH is installed, or if HP Systems Insight Manager is used to remotely manage the blade (see Section 12-5, "HP Systems Insight Manager "). 4-2-3 Creating the Windows XP-32 image Follow these steps to create the Windows XP-32 image using the Microsoft Windows XP-32 CD: 1. Connect a monitor, USB hub, keyboard, mouse, diskette drive, and CD/DVD drive to the Local I/O Cable (see Figure 3-3). 2. Cycle power on the blade to initiate a reboot. When the BIOS console appears, change the BIOS Remote Console Mode to Setup Mode as described in Section 2-1, "Setting Remote Console Mode." Setup Mode causes the NVIDIA graphics adapter and ATI video adapter to both be visible to the Windows operating system to ensure correct driver installation. 3. Boot the blade workstation from the Windows XP-32 CD. 4. Immediately after booting Windows from the CD, press the F6 key when prompted (see Figure 4-1). This step is required to install third-party drivers. In Figure 4-1, the HP Smart Array E200i SAS storage driver is installed. IMPORTANT: The F6 key must be pressed quickly. If not pressed quickly, the installation process will continue but, at a later step, Windows will fail to boot because of the missing SAS storage driver. Figure 4-1 Windows setup screen Creating a custom Windows XP-32 image 36
-
 1
1 -
2
-
3
-
4
-
5
-
6
-
7
-
8
-
9
-
10
-
11
-
12
-
13
-
14
-
15
-
16
-
17
-
18
-
19
-
20
-
21
-
22
-
23
-
24
-
25
-
26
-
27
-
28
-
29
-
30
-
 31
31 -
 32
32 -
 33
33 -
 34
34 -
 35
35 -
 36
36 -
 37
37 -
 38
38 -
 39
39 -
 40
40 -
 41
41 -
42
-
43
-
44
-
45
-
46
-
47
-
48
-
49
-
50
-
51
-
52
-
53
-
54
-
55
-
56
-
57
-
58
-
59
-
60
-
61
-
62
-
63
-
64
-
65
-
66
-
67
-
68
-
69
-
70
-
71
-
72
-
73
-
74
-
75
-
76
-
77
-
78
-
79
-
80
-
81
-
82
-
83
-
84
-
85
-
86
-
87
-
88
-
89
-
90
-
91
-
92
-
93
-
94
-
95
-
96
-
97
-
98
-
99
-
100
-
101
-
102
-
103
-
104
-
105
 |
 |