HP Scanjet N6000 Setup and Support Guide - Page 7
Step 2. Install the software, Step 3. Connect the power supply
 |
View all HP Scanjet N6000 manuals
Add to My Manuals
Save this manual to your list of manuals |
Page 7 highlights
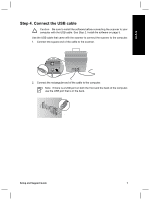
English Step 2. Install the software A number of scanning software programs are included with the scanner. For information about these programs, see Scanning software CD on page 11. Caution Install the scanning software before connecting the USB cable to the computer. 1. Insert the scanning software CD that came with the scanner into the computer CD drive. 2. Wait for the installation dialog box to display. If the installation dialog box does not display after a few moments, do the following: a. Click Start and then click Run. The Run dialog box is displayed. b. In the Open box, type d:\setup.exe (where d: is the letter of your computer's CD drive). c. Click OK. 3. In the installation dialog box, select which software programs you want to install. To use all of the features of the scanner, it is recommended that you install all of the programs on the CD. 4. Follow the onscreen instructions to complete the installation. During the installation process you are asked whether you want to enable Power Save mode or Instant Lamp On mode. For information about these options, see Power Save mode or Instant Lamp On mode on page 11. The install program will also check to see whether you have Adobe Acrobat Reader installed for viewing PDF files. If it is not installed, you are given instructions for installing it. Step 3. Connect the power supply The power supply has an attached cable that plugs into the back of the scanner. The connector on the end of this cable has a green LED that is on when the power supply is functioning correctly. Setup and Support Guide 5
-
 1
1 -
 2
2 -
 3
3 -
 4
4 -
 5
5 -
 6
6 -
 7
7 -
 8
8 -
 9
9 -
 10
10 -
 11
11 -
 12
12 -
13
-
14
-
15
-
16
-
17
-
18
-
19
-
20
-
21
-
22
-
23
-
24
-
25
-
26
-
27
-
28
-
29
-
30
-
31
-
32
-
33
-
34
-
35
-
36
-
37
-
38
-
39
-
40
-
41
-
42
-
43
-
44
-
45
-
46
-
47
-
48
-
49
-
50
-
51
-
52
-
53
-
54
-
55
-
56
-
57
-
58
-
59
-
60
-
61
-
62
-
63
-
64
-
65
-
66
-
67
-
68
-
69
-
70
-
71
-
72
-
73
-
74
-
75
-
76
-
77
-
78
-
79
-
80
-
81
-
82
-
83
-
84
-
85
-
86
-
87
-
88
-
89
-
90
-
91
-
92
-
93
-
94
-
95
-
96
-
97
-
98
-
99
-
100
-
101
-
102
-
103
-
104
-
105
-
106
-
107
-
108
-
109
-
110
-
111
-
112
-
113
-
114
-
115
-
116
 |
 |
