HP Scanjet N6000 Setup and Support Guide - Page 9
Step 4. Connect the USB cable
 |
View all HP Scanjet N6000 manuals
Add to My Manuals
Save this manual to your list of manuals |
Page 9 highlights
English Step 4. Connect the USB cable Caution Be sure to install the software before connecting the scanner to your computer with the USB cable. See Step 2. Install the software on page 5. Use the USB cable that came with the scanner to connect the scanner to the computer. 1. Connect the square end of the cable to the scanner. 2. Connect the rectangular end of the cable to the computer. Note If there is a USB port on both the front and the back of the computer, use the USB port that is in the back. Setup and Support Guide 7
-
 1
1 -
2
-
3
-
 4
4 -
 5
5 -
 6
6 -
 7
7 -
 8
8 -
 9
9 -
 10
10 -
 11
11 -
 12
12 -
 13
13 -
 14
14 -
15
-
16
-
17
-
18
-
19
-
20
-
21
-
22
-
23
-
24
-
25
-
26
-
27
-
28
-
29
-
30
-
31
-
32
-
33
-
34
-
35
-
36
-
37
-
38
-
39
-
40
-
41
-
42
-
43
-
44
-
45
-
46
-
47
-
48
-
49
-
50
-
51
-
52
-
53
-
54
-
55
-
56
-
57
-
58
-
59
-
60
-
61
-
62
-
63
-
64
-
65
-
66
-
67
-
68
-
69
-
70
-
71
-
72
-
73
-
74
-
75
-
76
-
77
-
78
-
79
-
80
-
81
-
82
-
83
-
84
-
85
-
86
-
87
-
88
-
89
-
90
-
91
-
92
-
93
-
94
-
95
-
96
-
97
-
98
-
99
-
100
-
101
-
102
-
103
-
104
-
105
-
106
-
107
-
108
-
109
-
110
-
111
-
112
-
113
-
114
-
115
-
116
 |
 |
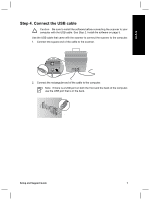
Step 4. Connect the USB cable
Caution
Be sure to install the software before connecting the scanner to your
computer with the USB cable. See
Step 2. Install the software
on page 5.
Use the USB cable that came with the scanner to connect the scanner to the computer.
1.
Connect the square end of the cable to the scanner.
2.
Connect the rectangular end of the cable to the computer.
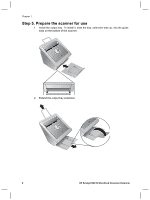
Note
If there is a USB port on both the front and the back of the computer,
use the USB port that is in the back.
Setup and Support Guide
7
English