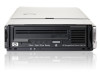
HP StoreEver LTO-4 Ultrium SB1760c HP StorageWorks Tape Blade User Guide (6250 - Page 33
Powering the Tape Blade on and off, Power up
 |
View all HP StoreEver LTO-4 Ultrium SB1760c manuals
Add to My Manuals
Save this manual to your list of manuals |
Page 33 highlights
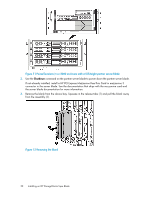
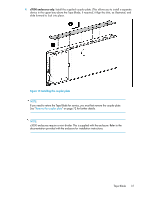
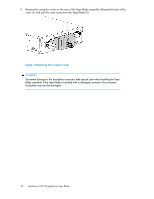
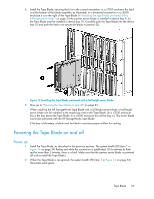
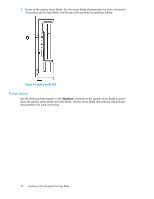
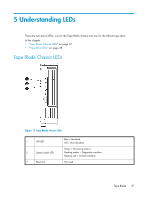
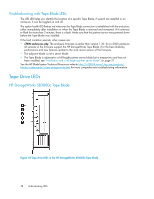
6. Install the Tape Blade, ensuring that it is in the correct orientation: in a c7000 enclosure the latch is at the bottom of the blade assembly, as illustrated; in a horizontal orientation in a c3000 enclosure it is to the right of the Tape Blade. In "Installing the tape blade, partnered with a full-height server blade" on page 33 the partner server blade is installed in device bay 9. So, the Tape Blade must be installed in device bay 10. Carefully push the Tape Blade into the device bay (1) and push the latch in to secure the blade in position (2). Figure 15 Installing the Tape Blade, partnered with a full-height server blade . 7. Now go to "Powering the Tape Blade on and off" on page 33. When installing the HP StorageWorks Tape Blade with a full-height server blade, a half-height server blade can be installed in the empty bay next to the Tape Blade. (In a c7000 enclosure this is the bay above the Tape Blade. In a c3000 enclosure this will be bay 4.) This server blade cannot be partnered with the HP StorageWorks Tape Blade. If the bay is left empty, a blank must be fitted to maintain proper airflow for cooling. Powering the Tape Blade on and off Power up 1. Install the Tape Blade, as described in the previous sections. The system health LED (item 1 in Figure 16 on page 34) flashes red while the connection is established. (If it continues to flash red for more than 2 minutes, there is a fault. Make sure that the partner server blade is powered off and re-install the Tape Blade.) 2. When the Tape Blade is recognized, the system health LED (item 1 in Figure 16 on page 34) illuminates solid green. Tape Blade 33
-
 1
1 -
2
-
3
-
4
-
5
-
6
-
7
-
8
-
9
-
10
-
11
-
12
-
13
-
14
-
15
-
16
-
17
-
18
-
19
-
20
-
21
-
22
-
23
-
24
-
25
-
26
-
27
-
 28
28 -
 29
29 -
 30
30 -
 31
31 -
 32
32 -
 33
33 -
 34
34 -
 35
35 -
 36
36 -
 37
37 -
 38
38 -
39
-
40
-
41
-
42
-
43
-
44
-
45
-
46
-
47
-
48
-
49
-
50
-
51
-
52
-
53
-
54
-
55
-
56
-
57
-
58
-
59
-
60
-
61
-
62
-
63
-
64
-
65
-
66
-
67
-
68
-
69
-
70
-
71
-
72
-
73
-
74
-
75
-
76
-
77
-
78
-
79
-
80
-
81
-
82
-
83
-
84
 |
 |
