HP TouchSmart 9100 User Guide - Page 20
Wireless Keyboard and Mouse, Synchronizing the wireless keyboard or mouse - manual
 |
View all HP TouchSmart 9100 manuals
Add to My Manuals
Save this manual to your list of manuals |
Page 20 highlights
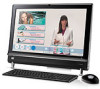
Wireless Keyboard and Mouse Your wireless keyboard and mouse are easy to set up. Just remove the battery tabs on both the keyboard and the mouse. Also, make sure the Power switch on the bottom of the mouse is in the On position (the keyboard does not have a Power switch). Then, turn on the computer. If you have trouble using the keyboard and mouse, manually synchronize them as explained in the next procedure. The keyboard is designed to fit under your computer when not in use. Your product may vary from the one shown here. The wireless receiver shown here is preinstalled in the computer. IMPORTANT: For better mouse battery life and performance, avoid using your mouse on a dark or high-gloss surface, and turn mouse power off when not in use. Synchronizing the wireless keyboard or mouse The wireless keyboard and mouse are pre-synchronized, for your convenience, to work with your HP TouchSmart 9100 Business PC. The keyboard and mouse should work immediately after you first pull the battery tabs to activate the preinstalled batteries, and then turn on the mouse (B). You may need to manually synchronize the wireless keyboard or mouse if they are not functioning. To synchronize them: „ Make sure the keyboard and mouse are next to the HP TouchSmart 9100, within 30 cm (1 foot) and away from interference from other devices. „ Keyboard: Press the Connect button on the bottom of the keyboard (A) for five seconds. The blue activity LED from the wireless receiver illuminates when the synchronization command has been received and turns off when synchronization is complete. „ Mouse: Press the Connect button on the bottom of the mouse (C) for five seconds. The blue activity LED from the wireless receiver illuminates when the synchronization command has been received and turns off when synchronization is complete. 14 User Guide (Features may vary by model)
-
 1
1 -
2
-
3
-
4
-
5
-
6
-
7
-
8
-
9
-
10
-
11
-
12
-
13
-
14
-
 15
15 -
 16
16 -
 17
17 -
 18
18 -
 19
19 -
 20
20 -
 21
21 -
 22
22 -
 23
23 -
 24
24 -
 25
25 -
26
-
27
-
28
-
29
-
30
-
31
-
32
-
33
-
34
-
35
-
36
-
37
-
38
-
39
-
40
-
41
-
42
-
43
-
44
-
45
-
46
-
47
-
48
-
49
-
50
-
51
-
52
-
53
-
54
-
55
-
56
-
57
-
58
-
59
-
60
-
61
-
62
-
63
-
64
-
65
-
66
-
67
-
68
-
69
-
70
 |
 |
