HP TouchSmart IQ506t Upgrade and Service Guide - Page 17
HP TouchSmart PC on Remove the nine screws that secure the back cover to the chassis. Four
 |
View all HP TouchSmart IQ506t manuals
Add to My Manuals
Save this manual to your list of manuals |
Page 17 highlights
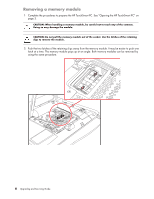
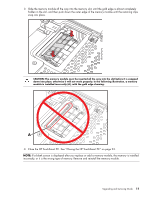
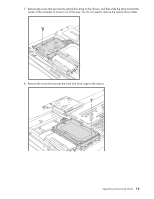
3 Remove the optical disc drive cover by lifting the bottom edge with your finger or a screwdriver, and then rotating the cover out and away from the computer. There are several tabs and two guide pins holding the cover in place, so be careful not to break the cover by applying too much force. 4 Make sure the wireless keyboard and mouse receiver (A) has been removed. See "Opening the HP TouchSmart PC" on page 3. Remove the nine screws that secure the back cover to the chassis. Four of the screws are located along the bottom edge of the back cover, two are located on the sides of the optical drive, and three are located in the connector area. A Upgrading and Servicing Guide 13
-
 1
1 -
2
-
3
-
4
-
5
-
6
-
7
-
8
-
9
-
10
-
11
-
 12
12 -
 13
13 -
 14
14 -
 15
15 -
 16
16 -
 17
17 -
 18
18 -
 19
19 -
 20
20 -
 21
21 -
 22
22 -
23
-
24
-
25
-
26
-
27
-
28
-
29
-
30
-
31
-
32
 |
 |

Upgrading and Servicing Guide
13
3
Remove the optical disc drive cover by lifting the bottom edge with your finger or a screwdriver, and
then rotating the cover out and away from the computer. There are several tabs and two guide pins
holding the cover in place, so be careful not to break the cover by applying too much force.
4
Make sure the wireless keyboard and mouse receiver (
A
) has been removed. See “Opening the
HP TouchSmart PC” on page 3. Remove the nine screws that secure the back cover to the chassis. Four
of the screws are located along the bottom edge of the back cover, two are located on the sides of the
optical drive, and three are located in the connector area.
A