HP Ultrium 448c HP StorageWorks Tape Blade User Guide (625055-001, November 20 - Page 71
Replacing the Tape Blade chassis, Remove the Tape Blade
 |
View all HP Ultrium 448c manuals
Add to My Manuals
Save this manual to your list of manuals |
Page 71 highlights
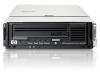
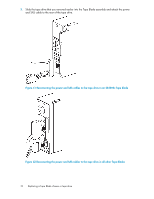
4. Power on the partner server blade. The tape drive will run its hardware self-test, which takes about 5 seconds. If self-test passes, the green Ready LED on the tape drive flashes and then shows steady green. Follow normal operating procedures to work with the Tape Blade. Follow the step-by-step instructions in this User Guide. Replacing the Tape Blade chassis There are five stages to this process: • Power down the Tape Blade and remove it from the blade enclosure • Full-height partner server blades only: Remove the coupler plate from the faulty Tape Blade chassis • Remove the good tape drive from the faulty Tape Blade chassis • Insert the tape drive into the replacement chassis • Install the replacement Tape Blade and power it up Remove the Tape Blade 1. Power down the partner server blade. This powers down the Tape Blade, see "Powering the Tape Blade on and off" on page 33. NOTE: Do not power down the partner server blade and remove power from the drive during read, write, fast-search, load and unload activities. NOTE: If there is a half-height server blade in the device bay directly above the Tape Blade, please remove it before you remove the Tape Blade. See the server blade documentation for more details. 2. Grasp the metal release latch, at the bottom of the Tape Blade in c7000 enclosures and to the right of the Tape Blade in c3000 enclosures, and pull forward until the locking mechanism disengages. Tape Blade 71
-
 1
1 -
2
-
3
-
4
-
5
-
6
-
7
-
8
-
9
-
10
-
11
-
12
-
13
-
14
-
15
-
16
-
17
-
18
-
19
-
20
-
21
-
22
-
23
-
24
-
25
-
26
-
27
-
28
-
29
-
30
-
31
-
32
-
33
-
34
-
35
-
36
-
37
-
38
-
39
-
40
-
41
-
42
-
43
-
44
-
45
-
46
-
47
-
48
-
49
-
50
-
51
-
52
-
53
-
54
-
55
-
56
-
57
-
58
-
59
-
60
-
61
-
62
-
63
-
64
-
65
-
 66
66 -
 67
67 -
 68
68 -
 69
69 -
 70
70 -
 71
71 -
 72
72 -
 73
73 -
 74
74 -
 75
75 -
 76
76 -
77
-
78
-
79
-
80
-
81
-
82
-
83
-
84
 |
 |
