HP Ultrium 448c HP StorageWorks Tape Blade User Guide (625055-001, November 20 - Page 73
Remove the tape drive, chassis until the power and data cable become accessible.
 |
View all HP Ultrium 448c manuals
Add to My Manuals
Save this manual to your list of manuals |
Page 73 highlights
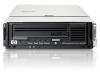
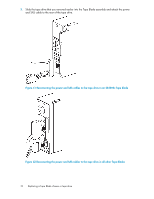
2. Gently start to slide the coupler plate in the opposite direction to installation Figure 35 Disconnecting the coupler plate . 1. Location to insert release pin 2. Slide back and lift coupler plate 3. Retain the coupler plate for use with the replacement chassis. Remove the tape drive 1. Press the mounting rails in towards the tape drive and slowly pull the tape drive away from the chassis until the power and data cable become accessible. Figure 36 Releasing the tape drive . Tape Blade 73
-
 1
1 -
2
-
3
-
4
-
5
-
6
-
7
-
8
-
9
-
10
-
11
-
12
-
13
-
14
-
15
-
16
-
17
-
18
-
19
-
20
-
21
-
22
-
23
-
24
-
25
-
26
-
27
-
28
-
29
-
30
-
31
-
32
-
33
-
34
-
35
-
36
-
37
-
38
-
39
-
40
-
41
-
42
-
43
-
44
-
45
-
46
-
47
-
48
-
49
-
50
-
51
-
52
-
53
-
54
-
55
-
56
-
57
-
58
-
59
-
60
-
61
-
62
-
63
-
64
-
65
-
66
-
67
-
 68
68 -
 69
69 -
 70
70 -
 71
71 -
 72
72 -
 73
73 -
 74
74 -
 75
75 -
 76
76 -
 77
77 -
 78
78 -
79
-
80
-
81
-
82
-
83
-
84
 |
 |

2.
Gently start to slide the coupler plate in the opposite direction to installation
Figure 35 Disconnecting the coupler plate
.
2. Slide back and lift coupler plate
1. Location to insert release pin
3.
Retain the coupler plate for use with the replacement chassis.
Remove the tape drive
1.
Press the mounting rails in towards the tape drive and slowly pull the tape drive away from the
chassis until the power and data cable become accessible.
Figure 36 Releasing the tape drive
.
Tape Blade
73