HP Vectra VE 5/xxx HP Vectra VE 5/xx Series 2, Familiarization guide - Page 30
Non-Plug and Play in, Windows 3.11, Windows 95
 |
View all HP Vectra VE 5/xxx manuals
Add to My Manuals
Save this manual to your list of manuals |
Page 30 highlights
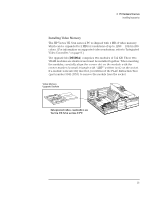
2 PC Hardware Structure Installing Accessories Non-Plug and Play in Windows 3.11 To install an ISA accessory board which is not Plug and Play in Windows 3.11, start the ICU program to declare the resources used by the board. To run the ICU: 1 Choose the Plug and Play facility in the Windows Program Manager. 2 Click on the ICU icon to launch the ISA Configuration Utility and configure system resources for the accessory board. The ICU is preloaded with configuration details for many non-Plug and Play accessory boards. If your accessory board is not listed by the ICU, there are two ways you can configure the accessory board: 1 Some non-Plug and Play accessory boards are supplied with a configuration file which can be used by the ICU to determine which resources are required by the board. When prompted by the ICU, insert the diskette containing the configuration file. 2 If there is no configuration file for your accessory board, you will need to enter the configuration details manually when prompted by the ICU. Refer to the documentation supplied with the accessory board for information about the resources the board requires. Non-Plug and Play in Windows 95 To install an ISA accessory board which is not Plug and Play in Windows 95, run the Add New Hardware wizard to configure the accessory. The settings selected by Windows 95 may be different from those recommended by the board's manufacturer. Should this be the case, it might be necessary to alter the board's jumpers. Refer to the documentation supplied with Windows 95 for further details. 26
-
 1
1 -
2
-
3
-
4
-
5
-
6
-
7
-
8
-
9
-
10
-
11
-
12
-
13
-
14
-
15
-
16
-
17
-
18
-
19
-
20
-
21
-
22
-
23
-
24
-
 25
25 -
 26
26 -
 27
27 -
 28
28 -
 29
29 -
 30
30 -
 31
31 -
 32
32 -
 33
33 -
 34
34 -
 35
35 -
36
-
37
-
38
-
39
-
40
-
41
-
42
-
43
-
44
-
45
-
46
-
47
-
48
-
49
-
50
-
51
-
52
-
53
-
54
 |
 |