HP Vectra VE 5/xxx HP Vectra VE 5/xx Series 2, Familiarization guide - Page 31
Replacing the Microprocessor - 133
 |
View all HP Vectra VE 5/xxx manuals
Add to My Manuals
Save this manual to your list of manuals |
Page 31 highlights
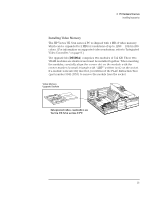
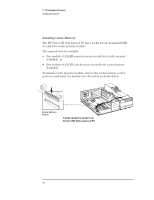
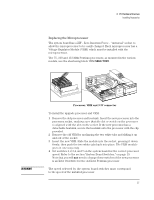
2 PC Hardware Structure Installing Accessories Replacing the Microprocessor The system board has a ZIF - Zero Insertion Force - "universal" socket to allow the microprocessor to be easily changed. Each microprocessor has a Voltage Regulator Module (VRM) which must be installed with the microprocessor. The 75, 100 and 133 MHz Pentium processors, as mounted in the various models, use the shortening block VRM 5063-7939. WARNING Processor, VRM and 3.3V connector To install the upgrade processor and VRM: 1 Remove the old processor and heatsink. Insert the new processor into the processor socket, making sure that the dot or notch on the processor is aligned with the dot on the socket. If the new processor has a detachable heatsink, secure the heatsink onto the processor with the clip provided. 2 Remove the old VRM by unclipping the two white tabs and sliding it up and out of the socket. 3 Insert the new VRM. Slide the module into the socket, pressing it down firmly, then push the two white tabs back into place. The VRM module goes in one way only. 4 Set switches 1,2,3,4, and 7 on the system board for the correct processor speed. Refer to the section "System Board Switches," on page 19. Note that you will not need to change these switches if the new processor is an Intel Overdrive for the old Intel Pentium processor. The speed selected by the system board switches must correspond to the speed of the installed processor. 27
-
 1
1 -
2
-
3
-
4
-
5
-
6
-
7
-
8
-
9
-
10
-
11
-
12
-
13
-
14
-
15
-
16
-
17
-
18
-
19
-
20
-
21
-
22
-
23
-
24
-
25
-
 26
26 -
 27
27 -
 28
28 -
 29
29 -
 30
30 -
 31
31 -
 32
32 -
 33
33 -
 34
34 -
 35
35 -
 36
36 -
37
-
38
-
39
-
40
-
41
-
42
-
43
-
44
-
45
-
46
-
47
-
48
-
49
-
50
-
51
-
52
-
53
-
54
 |
 |
