HP Vectra XU 6/XXX HP Vectra VT 6/xxx, Familiarization guide - Page 20
Replacing the Cover
 |
View all HP Vectra XU 6/XXX manuals
Add to My Manuals
Save this manual to your list of manuals |
Page 20 highlights
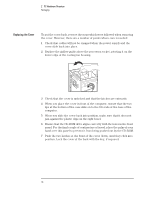
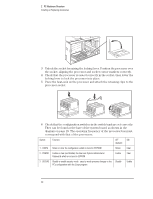
2 PC Hardware Structure Packaging Replacing the Cover To put the cover back, reverse the steps which were followed when removing the cover. However, there are a number of points where care is needed: 1 Check that cables will not be snagged when the power supply and the cover slide back into place. 2 Replace the airflow guide above the processor socket, pivoting it on the lower edge of the cooling fan housing. 3 Check that the cover is unlocked and that the latches are outwards. 4 When you place the cover in front of the computer, ensure that the two lips at the bottom of the case slide on to the two rails at the base of the computer. 5 When you slide the cover back into position, make sure that it does not jam against the plastic clips on the right bezel. 6 Ensure that the CD-ROM drive aligns correctly with the holes in the front panel. For the final couple of centimeters of travel, place the palm of your hand over this panel to prevent it from being pushed out by the CD-ROM. 7 Push the two latches at the front of the cover down, until they click into position. Lock the cover at the back with the key, if required. 16
-
 1
1 -
2
-
3
-
4
-
5
-
6
-
7
-
8
-
9
-
10
-
11
-
12
-
13
-
14
-
 15
15 -
 16
16 -
 17
17 -
 18
18 -
 19
19 -
 20
20 -
 21
21 -
 22
22 -
 23
23 -
 24
24 -
 25
25 -
26
-
27
-
28
-
29
-
30
-
31
-
32
-
33
-
34
-
35
-
36
-
37
-
38
-
39
-
40
-
41
-
42
-
43
-
44
-
45
-
46
-
47
-
48
-
49
-
50
-
51
-
52
-
53
-
54
-
55
-
56
 |
 |
