HP Workstation x2000 ATI Fire GL 2 graphics card users guide - Page 30
Settings, Display Properties, Warning, Apply, Have Disk, Display Diamond Monitor List
 |
View all HP Workstation x2000 manuals
Add to My Manuals
Save this manual to your list of manuals |
Page 30 highlights
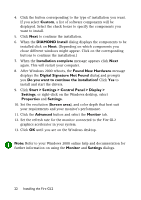
2. Set the desired operation mode for your monitor. Custom Modes Use resolution and refresh rates for this monitor as specified in the Settings dialog in Display Properties. This option allows you to take full advantage of the resolution/refresh rate capabilities of the video chip. Warning! Selecting a resolution or refresh rate that your monitor does not support can permanently damage the monitor. Check the monitor's documentation and verify that it supports the selected resolution and refresh rate. Select from list Use resolution/refresh rate settings optimized for your specific monitor. A. Select your monitor from the displayed monitor list. To select your monitor, scroll to the manufacturer of your monitor and highlight the manufacturer in the list. Click on the + sign and select your monitor. A list on the right menu pane displays resolutions and - for each resolution - the maximum refresh rate, as supported by the selected monitor. If the current video mode (specified in the Settings dialog) is not supported by the selected monitor, the resolution/refresh rate setting will be automatically reduced. B. Click the Apply or OK button to enable your monitor selection. If the list does not display your monitor type and you have a disk from the monitor manufacturer, use the Have Disk button to import the monitor information to the internal monitor list. A. Click the Have Disk button, insert the disk, and select the directory or file containing information about your monitor. B. Then select your monitor and click the Apply or OK button. Click the Display Diamond Monitor List button to switch the displayed monitor list back from the manufacturer's disk to the internal monitor list. Fire GL2 Software Utilities 27
-
 1
1 -
2
-
3
-
4
-
5
-
6
-
7
-
8
-
9
-
10
-
11
-
12
-
13
-
14
-
15
-
16
-
17
-
18
-
19
-
20
-
21
-
22
-
23
-
24
-
 25
25 -
 26
26 -
 27
27 -
 28
28 -
 29
29 -
 30
30 -
 31
31 -
 32
32 -
 33
33 -
 34
34 -
 35
35 -
36
-
37
-
38
-
39
-
40
-
41
-
42
-
43
-
44
-
45
-
46
-
47
-
48
-
49
-
50
-
51
-
52
 |
 |