HP iPAQ rx3100 HP iPAQ rx3000 series - White Paper - Page 3
Taking Photos - series
 |
View all HP iPAQ rx3100 manuals
Add to My Manuals
Save this manual to your list of manuals |
Page 3 highlights
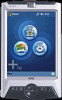
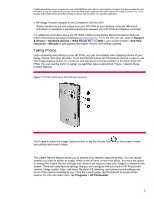
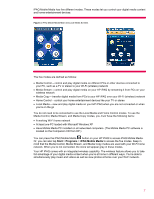
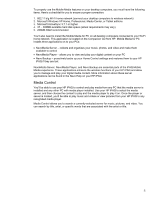
*Additional software may be required to view H.263/MPEG4 video files on your desktop computer that are recorded by your HP iPAQ. It may be helpful to access the on-device Help to get additional information about HP Image Zone for PCs. You'll be able to find information about file formats as well as various topics on using this application. • HP Image Transfer (located on the Companion CD from HP) -Easily transfer photos and videos from your HP iPAQ to your desktop computer (Microsoft ActiveSync to establish a standard partnership between your HP iPAQ and desktop computer) For additional information about the HP iPAQ rx3000 series Mobile Media Companion features, refer to the product document located at http://www.hp.com. From the HP web site, click on Support & Drivers > Handheld devices > iPAQ Pocket PC > rx 3000 > your model number > Self-Help resources > Manuals to get support information, drivers, and various updates. Taking Photos Upon unpacking and setting up your HP iPAQ, you can immediately start snapping photos of your family, friends, and other favorites. You'll find that the built-in HP Photosmart camera is easy to use. The Image Capture button (1), mirror (2), and camera lens (3) are located on the back of the HP iPAQ. You can use the mirror to center yourself then take a self-portrait. Figure 1 depicts these product features. Figure 1. HP iPAQ rx3000 series Mobile Media Companion You'll need to press the Image Capture button or tap the Shutter Icon your photos and record videos. on the screen to take The Instant Review feature allows you to preview your recently-captured photos. You can decide whether you want to delete an image, share it with a friend, or store the photo. You have the option to change the Instant Review Settings and choose how long you want your images to remain on the screen. There are many feature settings that you can configure with your built-in HP Photosmart camera. Image quality, video, self-timer, file store, AE metering, and camera sound settings are some of the options available to you. From the Launch page, tap Photosmart to access these options. Or, from the Start menu, tap Programs > HP Photosmart. 3
-
 1
1 -
 2
2 -
 3
3 -
 4
4 -
 5
5 -
 6
6 -
 7
7 -
 8
8 -
 9
9 -
10
-
11
-
12
-
13
-
14
 |
 |