HP mt21 Administrator Guide 8 - Page 60
DHCP options, Component Manager, Removing components
 |
View all HP mt21 manuals
Add to My Manuals
Save this manual to your list of manuals |
Page 60 highlights
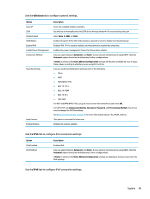
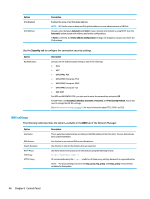
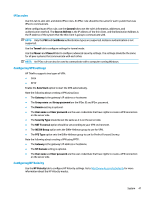
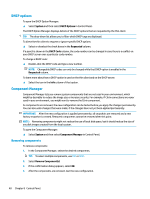
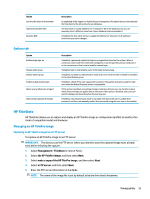
DHCP options To open the DHCP Option Manager: ▲ Select System and then select DHCP Options in Control Panel. The DHCP Option Manager displays details of the DHCP options that are requested by the thin client. TIP: The drop-down list allows you to filter which DHCP tags are displayed. To direct the thin client to request or ignore specific DHCP options: ▲ Select or deselect the check boxes in the Requested column. If a pencil is shown in the DHCP Code column, the code number can be changed in case there is a conflict on your DHCP server over a particular code number. To change a DHCP code: ▲ Double-click the DHCP code and type a new number. NOTE: Changeable DHCP codes can only be changed while that DHCP option is enabled in the Requested column. To learn more about how a DHCP option is used on the thin client and on the DHCP server: ▲ Select the icon in the Info column of that option. Component Manager Component Manager lets you remove system components that are not used in your environment, which might be desirable to reduce the image size or increase security. For example, if Citrix connections are never used in your environment, you might want to remove the Citrix component. As components are removed, the new configuration can be tested before you apply the changes permanently. You can also undo changes that were made, if the changes have not yet been applied permanently. IMPORTANT: After the new configuration is applied permanently, all snapshots are removed and a new factory snapshot is created. Removed components cannot be restored after this point. NOTE: Removing components might not reduce the use of local disk space, but it should reduce the size of any disk images created from the local system. To open the Component Manager: ▲ Select System and then select Component Manager in Control Panel. Removing components To remove components: 1. In the Component Manager, select the desired components. TIP: To select multiple components, use Ctrl or Shift. 2. Select Remove Component(s). 3. If the confirmation dialog appears, select OK. 4. After the components are removed, test the new configuration. 48 Chapter 8 Control Panel
-
 1
1 -
2
-
3
-
4
-
5
-
6
-
7
-
8
-
9
-
10
-
11
-
12
-
13
-
14
-
15
-
16
-
17
-
18
-
19
-
20
-
21
-
22
-
23
-
24
-
25
-
26
-
27
-
28
-
29
-
30
-
31
-
32
-
33
-
34
-
35
-
36
-
37
-
38
-
39
-
40
-
41
-
42
-
43
-
44
-
45
-
46
-
47
-
48
-
49
-
50
-
51
-
52
-
53
-
54
-
 55
55 -
 56
56 -
 57
57 -
 58
58 -
 59
59 -
 60
60 -
 61
61 -
 62
62 -
 63
63 -
 64
64 -
 65
65 -
66
-
67
-
68
-
69
-
70
-
71
-
72
-
73
-
74
-
75
-
76
-
77
-
78
-
79
-
80
-
81
-
82
-
83
-
84
-
85
-
86
-
87
-
88
-
89
-
90
-
91
-
92
-
93
-
94
-
95
-
96
-
97
-
98
-
99
-
100
-
101
-
102
-
103
-
104
-
105
-
106
-
107
-
108
-
109
-
110
-
111
-
112
-
113
-
114
-
115
-
116
-
117
-
118
-
119
-
120
-
121
-
122
-
123
-
124
-
125
-
126
-
127
-
128
-
129
-
130
-
131
-
132
-
133
-
134
-
135
-
136
-
137
-
138
-
139
-
140
-
141
-
142
-
143
-
144
-
145
-
146
-
147
-
148
-
149
-
150
-
151
-
152
-
153
-
154
-
155
-
156
-
157
-
158
-
159
-
160
-
161
-
162
-
163
-
164
-
165
-
166
-
167
-
168
-
169
-
170
-
171
-
172
-
173
-
174
-
175
-
176
-
177
-
178
-
179
-
180
-
181
-
182
-
183
-
184
 |
 |