HP mt42 Maintenance and Service Guide - Page 36
IMPORTANT, To make sure the bottom cover installs properly, be sure to remove and replace
 |
View all HP mt42 manuals
Add to My Manuals
Save this manual to your list of manuals |
Page 36 highlights
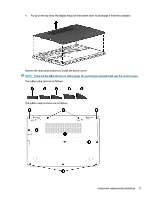
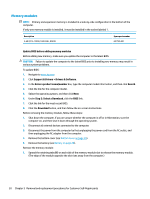
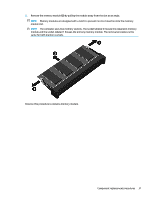
2. Remove the 10 rubber plugs (1) and the SD card blank (2) from the bottom cover. 3. In the order indicated in the following image, remove the 10 Phillips PM2.5×5.0 screws that secure the bottom cover to the computer. IMPORTANT: To make sure the bottom cover installs properly, be sure to remove and replace the screws in the order shown in the following image. 26 Chapter 5 Removal and replacement procedures for Customer Self-Repair parts
-
 1
1 -
2
-
3
-
4
-
5
-
6
-
7
-
8
-
9
-
10
-
11
-
12
-
13
-
14
-
15
-
16
-
17
-
18
-
19
-
20
-
21
-
22
-
23
-
24
-
25
-
26
-
27
-
28
-
29
-
30
-
 31
31 -
 32
32 -
 33
33 -
 34
34 -
 35
35 -
 36
36 -
 37
37 -
 38
38 -
 39
39 -
 40
40 -
 41
41 -
42
-
43
-
44
-
45
-
46
-
47
-
48
-
49
-
50
-
51
-
52
-
53
-
54
-
55
-
56
-
57
-
58
-
59
-
60
-
61
-
62
-
63
-
64
-
65
-
66
-
67
-
68
-
69
-
70
-
71
-
72
-
73
-
74
-
75
-
76
-
77
-
78
-
79
-
80
-
81
-
82
-
83
-
84
-
85
-
86
-
87
-
88
-
89
-
90
-
91
 |
 |

2.
Remove the 10 rubber plugs
(1)
and the SD card blank
(2)
from the bottom cover.
3.
In the order indicated in the following image, remove the 10 Phillips PM2.5×5.0 screws that secure the
bottom cover to the computer.
IMPORTANT:
To make sure the bottom cover installs properly, be sure to remove and replace the
screws in the order shown in the following image.
26
Chapter 5
Removal and replacement procedures for Customer Self-Repair parts