HP mt42 Maintenance and Service Guide - Page 48
and keyboard cable, Remove the keyboard
 |
View all HP mt42 manuals
Add to My Manuals
Save this manual to your list of manuals |
Page 48 highlights
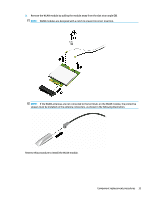
5. Rotate the top of the keyboard upward, and then place the keyboard on the palm rest (1). Remove the keyboard backlight cable (2), pointing stick cable (3), and keyboard cable (4). 6. Remove the keyboard (5). Reverse this procedure to install the keyboard. 38 Chapter 5 Removal and replacement procedures for Customer Self-Repair parts
-
 1
1 -
2
-
3
-
4
-
5
-
6
-
7
-
8
-
9
-
10
-
11
-
12
-
13
-
14
-
15
-
16
-
17
-
18
-
19
-
20
-
21
-
22
-
23
-
24
-
25
-
26
-
27
-
28
-
29
-
30
-
31
-
32
-
33
-
34
-
35
-
36
-
37
-
38
-
39
-
40
-
41
-
42
-
 43
43 -
 44
44 -
 45
45 -
 46
46 -
 47
47 -
 48
48 -
 49
49 -
 50
50 -
 51
51 -
 52
52 -
 53
53 -
54
-
55
-
56
-
57
-
58
-
59
-
60
-
61
-
62
-
63
-
64
-
65
-
66
-
67
-
68
-
69
-
70
-
71
-
72
-
73
-
74
-
75
-
76
-
77
-
78
-
79
-
80
-
81
-
82
-
83
-
84
-
85
-
86
-
87
-
88
-
89
-
90
-
91
 |
 |

5.
Rotate the top of the keyboard upward, and then place the keyboard on the palm rest
(1)
. Remove the
keyboard backlight cable
(2)
, pointing stick cable
(3)
, and keyboard cable
(4)
.
6.
Remove the keyboard
(5)
.
Reverse this procedure to install the keyboard.
38
Chapter 5
Removal and replacement procedures for Customer Self-Repair parts