HP mt42 Maintenance and Service Guide - Page 37
sizes of rubber plugs. Be sure that you reinstall them over the correct screws.
 |
View all HP mt42 manuals
Add to My Manuals
Save this manual to your list of manuals |
Page 37 highlights
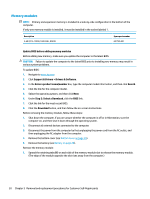
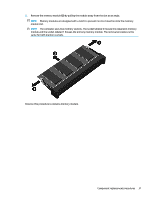
4. Pry up on the top (near the display hinge) of the bottom cover to disengage it from the computer. Reverse the removal procedures to install the bottom cover. NOTE: There are five different sizes of rubber plugs. Be sure that you reinstall them over the correct screws. The rubber-plug sizes are as follows. The rubber-plug locations are as follows. Component replacement procedures 27
-
 1
1 -
2
-
3
-
4
-
5
-
6
-
7
-
8
-
9
-
10
-
11
-
12
-
13
-
14
-
15
-
16
-
17
-
18
-
19
-
20
-
21
-
22
-
23
-
24
-
25
-
26
-
27
-
28
-
29
-
30
-
31
-
 32
32 -
 33
33 -
 34
34 -
 35
35 -
 36
36 -
 37
37 -
 38
38 -
 39
39 -
 40
40 -
 41
41 -
 42
42 -
43
-
44
-
45
-
46
-
47
-
48
-
49
-
50
-
51
-
52
-
53
-
54
-
55
-
56
-
57
-
58
-
59
-
60
-
61
-
62
-
63
-
64
-
65
-
66
-
67
-
68
-
69
-
70
-
71
-
72
-
73
-
74
-
75
-
76
-
77
-
78
-
79
-
80
-
81
-
82
-
83
-
84
-
85
-
86
-
87
-
88
-
89
-
90
-
91
 |
 |

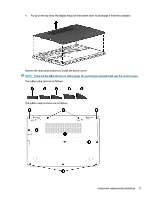
4.
Pry up on the top (near the display hinge) of the bottom cover to disengage it from the computer.
Reverse the removal procedures to install the bottom cover.
NOTE:
There are
five
different
sizes of rubber plugs. Be sure that you reinstall them over the correct screws.
The rubber-plug sizes are as follows.
The rubber-plug locations are as follows.
Component replacement procedures
27