HP vc4825T Troubleshooting Guide: HP vc4820T and vc4825T Thin Clients - Page 20
Replacing the Metal Side Cover and Side Access Panel,
 |
View all HP vc4825T manuals
Add to My Manuals
Save this manual to your list of manuals |
Page 20 highlights
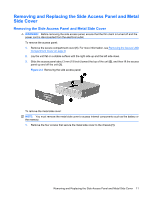
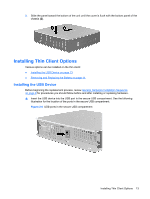
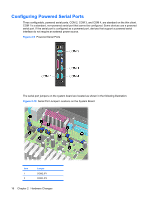
2. Lift the metal side cover, rear side first, off the unit (2). Figure 2-4 Removing the metal side cover Replacing the Metal Side Cover and Side Access Panel To replace the metal side cover: 1. Slip the front edge of the metal side cover under the lip on the chassis and lower the cover until it snaps into place (1). 2. Align the screw holes of the metal side cover with the chassis holes and insert and tighten the four screws (2). Figure 2-5 Replacing the metal side cover To replace the access panel: 1. Align the tabs on the access panel with the slots in the metal side cover and place the access panel on the side of the unit, offset about 3 mm (1/8 inch) toward the top of the unit (1). 12 Chapter 2 Hardware Changes
-
 1
1 -
2
-
3
-
4
-
5
-
6
-
7
-
8
-
9
-
10
-
11
-
12
-
13
-
14
-
 15
15 -
 16
16 -
 17
17 -
 18
18 -
 19
19 -
 20
20 -
 21
21 -
 22
22 -
 23
23 -
 24
24 -
 25
25 -
26
-
27
-
28
-
29
-
30
-
31
-
32
-
33
-
34
-
35
-
36
-
37
-
38
-
39
-
40
-
41
-
42
-
43
-
44
-
45
-
46
-
47
-
48
-
49
-
50
-
51
-
52
-
53
-
54
-
55
-
56
-
57
-
58
-
59
-
60
-
61
-
62
-
63
-
64
-
65
-
66
-
67
-
68
-
69
-
70
-
71
-
72
-
73
-
74
-
75
-
76
-
77
-
78
 |
 |

2.
Lift the metal side cover, rear side first, off the unit
(2)
.
Figure 2-4
Removing the metal side cover
Replacing the Metal Side Cover and Side Access Panel
To replace the metal side cover:
1.
Slip the front edge of the metal side cover under the lip on the chassis and lower the cover until it
snaps into place
(1)
.
2.
Align the screw holes of the metal side cover with the chassis holes and insert and tighten the four
screws
(2)
.
Figure 2-5
Replacing the metal side cover
To replace the access panel:
1.
Align the tabs on the access panel with the slots in the metal side cover and place the access panel
on the side of the unit, offset about 3 mm (1/8 inch) toward the top of the unit
(1)
.
12
Chapter 2
Hardware Changes